
You’re doing it wrong: Why your hip measurements don’t work
Today’s topic is somewhat of an advanced one, but it’s not necessarily hard to understand. It’s about how to measure your hips.
Most of the pattern instructions I’ve seen, including American sewing patterns such as the “Big 4″ and European sewing patterns such as Burda and Patrones, tell you to simply measure the widest part of your hips. In fact, I have similar instructions in my own Itch to Stitch patterns for simplicity’s sake.
Some years ago, I learned a better way to come up with a more accurate way for hip measurement when I was browsing on Frabjous Couture. Marina had a skirt draft-along; I didn’t draft along, but I did read through everything. That’s when I had an epiphany moment. It’s like seeing the entire Milky Way in a perfectly dark and still night. I wanted to smack myself for not realizing it earlier.
Simply put, the hip measurement is (or should be) related to how much your stomach protrudes. Regardless of the physique, everyone can have a protruding stomach; it can be a matter of posture.
Let me try to illustrate the concept step by step. Let’s call my line-drawn lady Sue. She looks like a Sue to me.
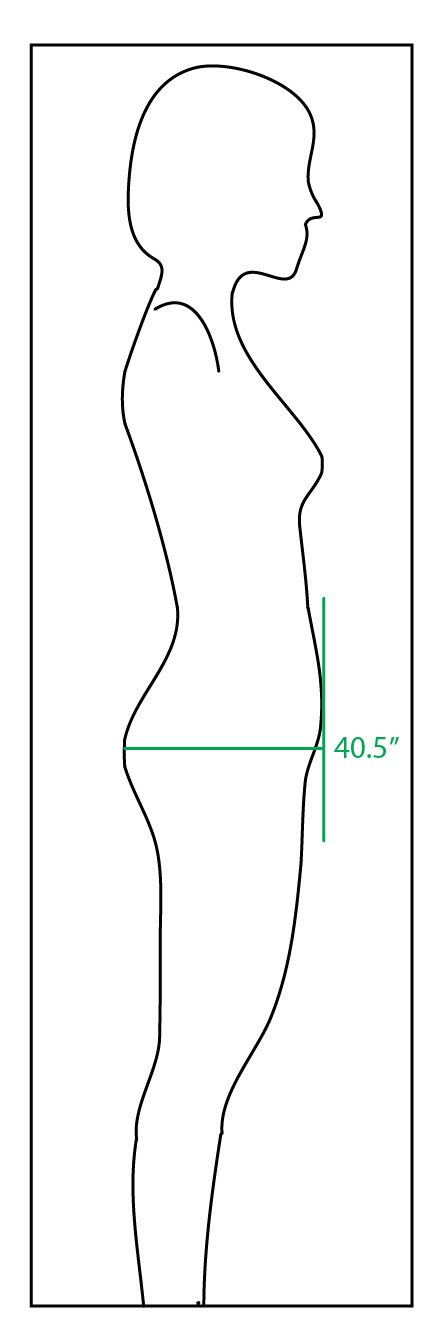
The widest part of Sue’s hips is 39”. When I measured her, the tape measure of course is parallel to the ground. If I move the tape measure up or down, her measurement is smaller. Hence, 39″ is her widest part.
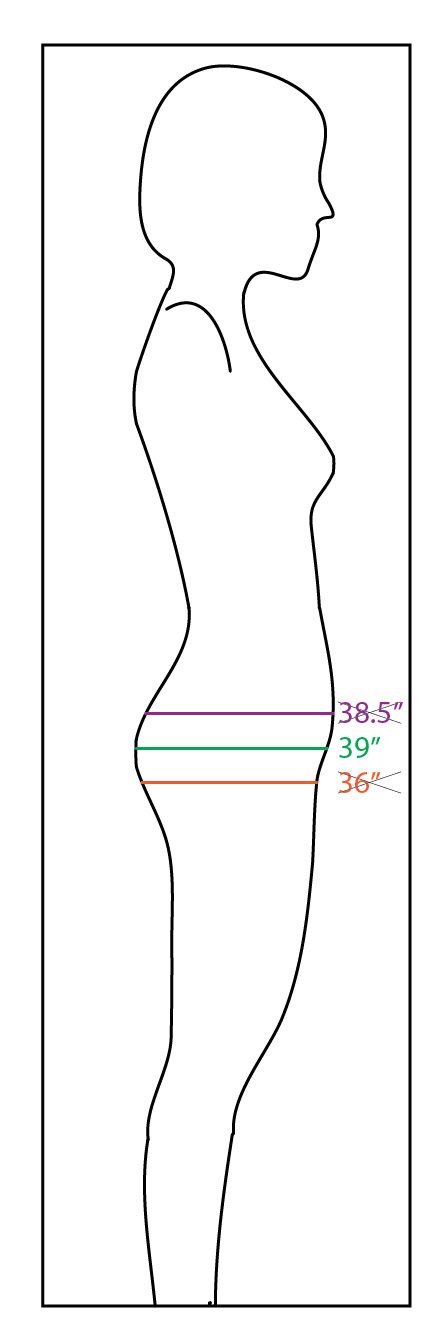
The widest part of Sue’s hip is 39″
Now if I superimpose a very fitted skirt that fits her waist and her hips, it looks something like this.
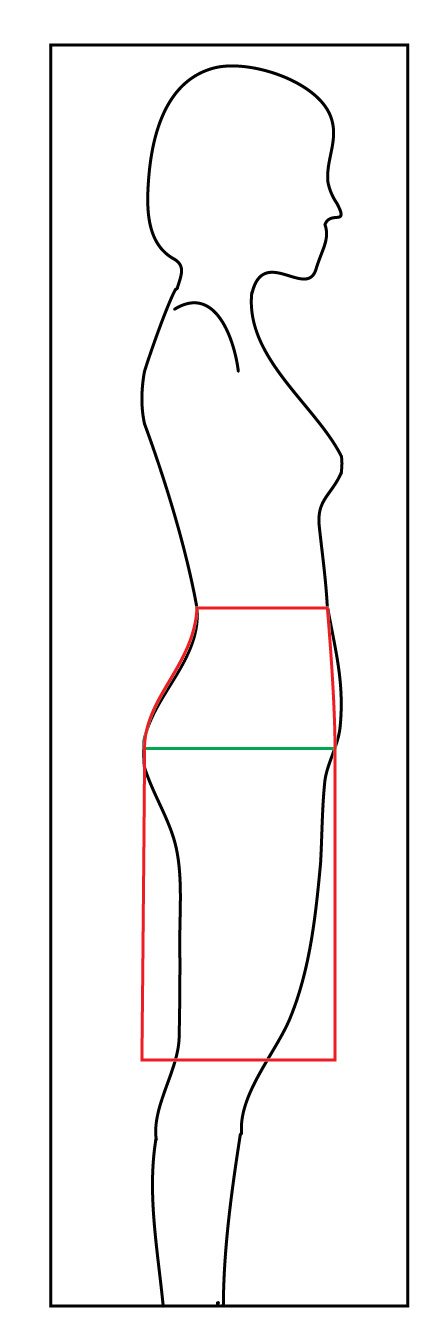
A superimposed skirt that fits Sue’s waist and hip measurements.
You see that her stomach sticks out of the skirt, which can only happen in the line-drawing world. In reality, her tummy would pull the skirt like this.
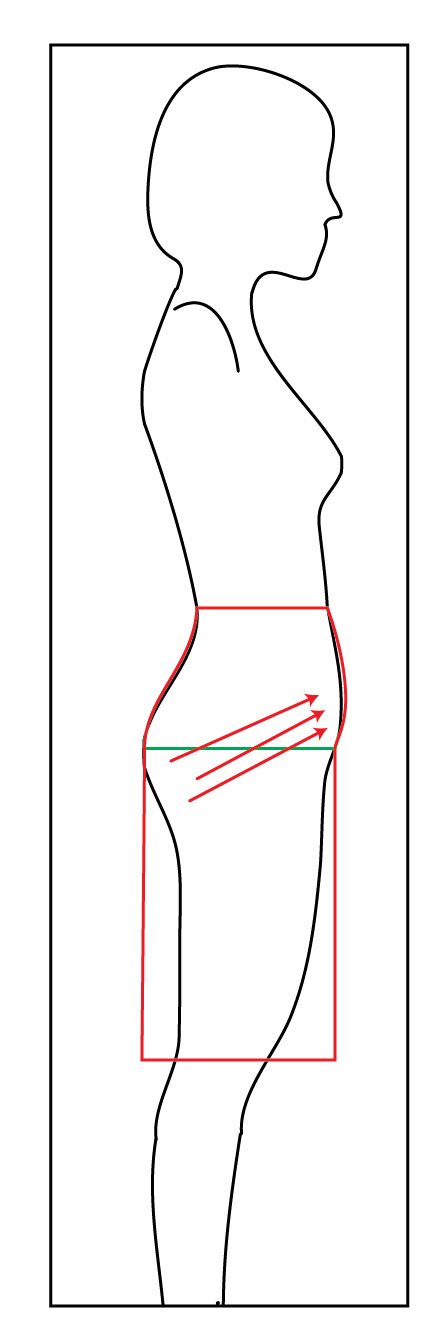
Sue’s protruding stomach pulls the skirt fabric and creates side wrinkles.
While a basic pencil or straight skirt has front darts to manage the increase in girth from the waist to the hips, they are not meant to handle a bump between the two points.
The beautiful Jessie from Jess Sew Fabulous graciously allowed me to use one of her photos to demonstrate how this looks like on a human being.
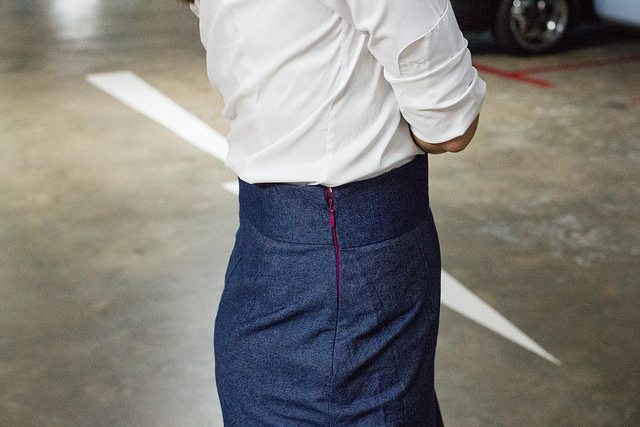
Fabric pulled on the side
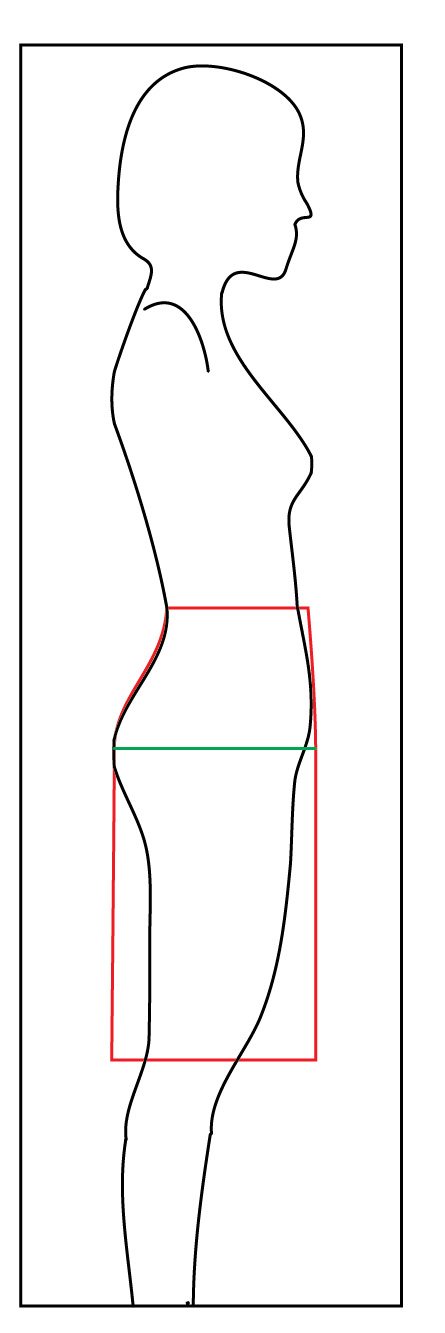
Now, if you measure the hips a different way, then the result would be different. Put a rigid board vertically against the protruding stomach, and include it when measuring the hips. In Sue’s simple line-drawing world, it would look like this.
Put a board vertically against the stomach, and include it when measuring the hips.
That increases Sue’s hip measurement by 1.5″. However, when she wears a skirt with the new measurement, the skirt is no longer pulled. But, now the waist could be slightly bigger (depending on the pattern and the size you choose), which can be solved pretty easily by taking deeper and shorter front darts. True, there’s more space below the belly too, but that way, it actually fits the shape better while eliminating the wrinkles/pulls on the fabric.
The skirt doesn’t pull anymore. If the waist is now too big, take deeper and shorter front darts.
I found that using a 6″ x 24″ quilting ruler (affiliate link) as the board works well for me; it’s not too wide to obstruct the measurement on the sides, but long enough to extend from the stomach to the hips. And it’s also rigid enough. Marina from Frabjous Couture used something she made out of rigid paper for the task, approached using a different method.
This way of measuring the hips work for almost everyone. Marina mentioned that she found her old German drafting book talked about it (although I can’t find the reference anymore). Also my Japanese pattern making book, Fundamentals of Garment Design by Bunka Fashion Collage, also briefly mentioned it:
“Measure the position where the protrusion of the buttocks is greatest, but that position often tends to be below the abdominal protrusion at the front of the body. Because in garment design a measurement around the hips with some added room for the protrusion of the abdomen and the buttocks is required, when measuring apply a celluloid sheet to the abdominal area and measure around the hips including the abdomen.”
I don’t know what the heck a celluloid sheet is. But the idea is to include the empty space below the belly when measuring. It has an accompanying illustration, but I am afraid I can’t reproduce it here.
But why is it often OK to use the old method of measuring just the widest part of the hips? It could be:
- The hips of the garment already have a lot of ease. People often complain that the Big 4’s patterns have too much ease; perhaps that’s why they do it. It’s easier to make the clothes smaller after the fact, but impossible to make it bigger.
- Some skirt styles make the hip measurements irrelevant. If it’s a circle skirt or flare skirt, the skirt flares immediately below the waist. Or the waist of the garment is very low and does not cover the protruding area.
- Your body type may be different. Perhaps the protruding portion of your stomach goes to the hip level, so you don’t have that empty space in the front. Or you don’t have a protruding stomach at all.
If you are making a slim pencil skirt with minimal ease, this is the right way to do the measurement.
Are you ready to sew some fitted skirt now? Whip one up using the Vientiane Skirt pattern. If you want the fitted look but are not ready for a woven skirt yet, why not give the Lindy Petal Skirt pattern a try (Yes, it’s a FREE pattern!)?
I hope it’s helpful!
Edit July 5, 2020: Thanks to a reader who was willing to spend the time to educate me about the wordings I used. I was told that the phases I used implied that slim meant fitter and better, which is obviously not true. I removed/reworded those phases. If anyone was hurt because of my choice of words, I sincerely apologize.

OMG, epiphany! How you have explained this makes SO much sense, thank you!
Hi I just found you and realised no one else has talked about this . I have been sewing for 25 years and I was taught to use 2 T ruler and work with them to put some masking tape on the ruler that is going down ways vertically and mark tummy touching then lines where the waist tummy starts to leave the ruler ( this is wear darts will be ) and the hip and bikini line . I started to do a coarse on pattern making and drafting it into photoshop but got tangled in what was the hip and stomach. This made me go internet searching to find a book I originally learned from but I found that some Asian countries made it look simple I still have a few papers on how these ladies drafted trousers and skirts but in Chinese.
I have found tag board to be very helpful for making a “tube.” For those who might be unfamiliar, tag is the same as Manila file folders but much larger. It is typically used by pattern designers to copy and preserve patterns.
Unpopular opinion:
While I understand the logic behind, as a matter of fact you change the style of the skirt, not unsimilar to making a FBA and leaving the extra but not necessarily required volume from apex to waist.
I’ve draped myself, including protruding tummy, a pencil skirt muslin in ca. 15 minutes including cutting and sewing. So much faster than anything else.
As for pants, this method would give me so much entirely unnecessary width at the crotch level I’d need at least one if not more fitting sessions to remove it.
My personal conclusion:
Keep in mind what you’re doing and ask yourself upfront what this method will result in for the pattern at hand. And don’t be surprised if either the style changes or you’re all of a sudden fighting challenges you haven’t had before. 🙂
There is an even easier way to do this which does not require anything more than a standard tape measure. I was learned this hack in the early 90’s when I worked for the famous Hollywood couturier Nolan Miller. The woman who draped the patterns for his designs learned her craft in some of the best ateliers in Paris prior to World War II.
Start by placing the tape measure so that it is around the widest part of the hips and is horizontal to the floor. Also you should bring the tape around from behind and bring the ends together on the front side of the body.
Now while you keep the tape in the same position at the fullest part of the hips at the back of the body, raise the front of the tape so it goes up around the fullest part of the tummy, Then use that measurement as the hip measurement. Instead of the tape being horizontal to the floor it will now curve up and around so it is higher in the center front. I hope this description is clear.
I was taught that way at a Fabric Store Event.
My measurements don’t seem to work because whenever I do get something that’s meant to measure only that largest area around the hips the pant sizes only come up 2× larger than I am and all my pants and shorts keep falling. My measurements say I should be an XL, but when I do wear XL now, although I’ve been wearing it before, they continue to fall and keep having to wear belts to keep them up. I seem to fit well and comfortably in stretchy Ms or regular L sizes, but its harder to find my exact pant size in terms of numbers. I have been on a weight loss journey and lost 50 lbs, so its been a bit of touch and go with finding a better fit, but even using this method, my measurements will only appear much larger than the previous method. Do you have any take on how I could better measure myself with this issue in mind? I do tend to prefer a tight and slimming fit with my pant sizes too, but with that in mind, what would you recommend doing? Does loose skin or water weight change the measurement factor at all and how much could it end up changing normally? I’m asking because I can only seem to find cute and affordable clothes by doing online shopping, but it’s harder and more of a hassle to have to keep returning the items that don’t fit well enough in the end.
Thank you! 😊
I use a long piece of paper, like two sheets of newspaper taped together. Draw a long line parallel to the long paper edges and about nine inches from the top of the paper. Wrap the paper around the hips so that the line is about where you’d take the ordinary hip measurement. Carefully line up the top and bottom edges of the paper and the drawn line so they’re all perfectly straight and parallel to the floor. Mark the edge of the overlapped paper and measure the paper from edge to mark. This method accommodates all my lower body bulges: belly, bottom and sides and fronts of my muscular thighs.
I found your article while Googling for things that would help me draft trousers according to the Helen Joseph-Armstrong book “Patternmaking for Fashion Design” 5th Edition. I’m using Seamly2D software to try and make digital patterns, and no matter what I did, I’d always get stuck because my high hip measures larger than my hip in circumference, and there’s not much different between either of those and my waist measurement. (I am kind of tubular in shape). To put in the darts according to HJA’s method (and others), you need more differential. Otherwise the whole pattern draft is mathematically impossible, and it’s infuriating to get stuck because of one’s body measurements.
Adding the bell protrusion to my hip measurement made it possible to do the drafting. I can make fit changes on a toile after this, but just getting past this point in the instructions is a major breakthrough.
(Also, to a previous commenter, let’s not get into whether fat is or isn’t okay. We’re all here to dress our own bodies, not judge each others’).
Have you noticed those clear acrylic wraps that are put around cakes to keep the icing off the sides while decorating? Those are celluloid. Celluloid sheets can be purchased off eBay as they are used as “drum wraps.” If you curve a sheet of celluloid around front of the belly it will extend the measure of the belly down to the hips so your measuring tape goes around the circumference of the waist and the hips at the same time.
What you get when you do this, is to my mind a straight rather than a pencil skirt. I never wear pencil skirts because with a fat tummy I look and more importantly feel awful in them. I don’t much like straight skirts either though. Most flattering is a gently skimming A line which can be pretty lean and elegant. I don’t like bulky pleats or gathers either, all of which make a tummy look more emphasised. A yoked skirt with gathers is an exception. A pencil skirt is basically not very nice on most people for varying reasons. Some times it is best simply to accept and avoid things which are not doing good things for us and that includes clothing.
Very interesting. My husband once, jokingly, mentioned that I did indeed have a very round behind (my dream shape). He paused and mentioned that it was concave…but still round.
Would this work on the back-end as well?
thank you
just to note…no need to trash my husband-we are very good friends and he was truly just kidding.
thank you…all
I have always wondered why protruding bellies were not considered when taking measurements. (I have one!)
I am excited to try this method. Many thanks!
25-30 yrs ago I was doing a lot of machine knitters, and one of our designers, a great lady named Jodie Raymond wrote about this in one of her books. We used 2 cookie sheets. If we didn’t, the skirt would cup under the butt, stretch forward at the front bump and the side seam would be anything but straight. We knitted some skirts that were just straight but we also made a lot of shaped skirts. I am glad to see that others are bringing this fitting technique not just to more skirts, but to more modalities as well.
It’s funny you mention machine knitting, because I have an excellent vintage book, Designing Garments on the Knitting Machine by Janet Nabney, that mentions this technique. She says: ‘One of the aids in measuring the [hip] circumference is a stiff piece of card measuring about 20 x 30 cm. This should be held over the somach when measuring the upper and lower hip, which will forestall any possibility of the skirt clinging to lumps or bumps that you don’t want to be noticed” (page 181).
I’ve been sewing for YEARS! I’ve made everything from undies to wedding gowns and never knew this. Thank you so much!
Thanks! Do you have any magic for fitting a sway back (protruding bottom) into a pattern, to make things fit better?
(I have worked four months, via physio, to reduce the sway back!)
Norma
Would you not use the same method of measurement as this article except for the back?
Just a thought.
This makes so much sense. I am going to try i. I am going to make a ” board” to use as a tool and and elastics with plastic snaps to hold it in place while I measure. One of the other comments suggested kneeling while measuring, but as I have mobility issues and have trouble getting up off the floor, I am going to modify my ” tool” to stay in place while I measure. Thank you for the article. Your awesome for giving the advice.
stand next to a low coffee table and rest the end of your ‘board’ on it and lean it against you, then measure.
This makes so much sense! I will keep it in mind.
Will this method work with shirts and blouses also?
If it’s a slim shirt, I would.
I just used it to draft and sew a kurung pesak gantung which is basically a knee-length tunic
I have used this method for a while now, and have made a tool to help my fluctuating tummy measurement.
Using 50cm wide (approx) lightweight sew-in interfacing ( I actually used the tear away machine embroidery interfacing) cut a length your approximate hip measurement plus about 15cm; square off the ends accurately. Draw a line parallel to the long edge roughly mid way, then draw a series of lines 1cm apart parallel to one short edge for about 20cm. To use, place around the body, lining up the long line drawn first, then mark where the 2 shorter ends meet, making sure the ends are square. This measurement is what you need, and I find you don’t really need to add any extra for ease for a fitted pencil skirt. It’s much easier making this measuring tool if you have a gridded cutting mat..
I would have to see an illustration in order to understand your description
Try sketching it out on paper. It might become clearer. Just a suggestion.
Visualize a side view of yourself standing up inside a tube that you just barely fit inside. The circumference of the tube would be taking into account where your body protrudes in all directions, not just towards the back (butt) or towards the front (tummy.)
So in her method, you’re basically just making a 12″ tall “tube” just around your midsection and butt, as if it were any other measuring tape. The total circumference of that is the measurement you’re looking for. I almost think parchment paper or pattern paper would be good for this because it’s a little rigid.
That is a brilliant suggestion! I’m going to use it on my next skirt. Thank you, Philippa.
I can’t wait to try this! Thank you
What an interesting read !
Thank you for the information and explanation!
For all us women of all different shapes such vital information goes a long way to making your own clothes.
Thanks again from a happy sewer & crocheter ?
Katrina
Amazing, this makes so much sense!! Thank you!!
I’ve just come across this, now! I absolutely love this! Thank you. Finally, I’ll get to sew my own skirts to wear at ease. I’ve recently lost weight and my skin has sagged a lot, leaving my tummy loose and hanging. I can’t wear straight skirts like I used to because they may fit around my waist when am standing but not when I attempt to sit. Thanks to your blog, I think I’ll be making my own skirts now.
I’m so thrilled with this blog. I cannot thank you enough.
This is a great post! Thanks so much for the visual!! I wonder if it would perhaps make it a little easier for accurate measuring for some if you kneeled, like up on both knees and then put the measuring grid in front of you, on the floor for extra support. I’m so afraid I’d be tipping the grid towards my knees. I’m sure it’s good to have someone help you, but just for an in case your are by yourself.
Hi , This was a very useful post.. The links in the post dont work (just letting you know). Thank you very much for it.. I know to draft pencil skirts with darts(just letting u know my skill level before i pose you the question)I have a question I really hope you can answer it for me. Lets assume the hip measurements are modified and the new wider measurements are used. The waist measuremnts (where skirt sits) is just the same and we draft new pattern based on new hip measuremnt. So I do not understand how the waist got bigger in your case? Thanks in advance Kennis 🙂 have a Great day
Hi Diya, thank you for letting me know about the links. As for the waist, it doesn’t end up bigger because you’d be taking the extra in through the darts; the text of the post mentions it. Have a great day!
Would this work for trousers? Anyone given it a try?
Hi Sasha, even though the example used a skirt, this applies to any garment that is fitted to your waist and hip, so yes, trousers would be included.
If you look at her sketches, notice that at the front side (tummy side) , the skirt forms a straight line from top to bottom, hence the wider waist and need for darts. Hope that helps.
Thank you, thank you. I have recently made three (3) dresses with straight skirts and none of them fit. The last one I will give away, maybe someone else can wear it. The other two I will save, just in case I lose weight . Thank you again
Celluloid is a word used when I was growing up in England for a type of rigid plastic. No unlike my 6×24 quilting ruler. I thought a few people might also be wondering this.
I have always had a protruding tush AND tummy. Add to this I am petite. Most pants if they fit in the tush, looked like Jodpurs – the hips were waaaay low. If I fit the tummy – there was massive (2-3″ ) gap in the small of my back. Thank you for explaining / showing how to fit items to my body!!!
Wow, new to making clothes as fed up of rtw not fitting. My first attempt at a fitted dress was awful, as I had these issue’s. I actually understand your article. Thank you so much, it’s given me the confidence to have another go.
God bess you! Lol but when measuring hips for body type proptions should I go on top of or under the belly?
Hi! I would measure both. Because if you are making a skirt with a waistband that goes under the belly, then the measurement done under the belly would be appropriate. If your skirt waistband will be over the belly, then that measurement would be more useful.
It should be under the belly and around the middle of buttocks.
Where is your high hip if you are a spoon shape female I have a short waist and my hips are shape like a shelf or what people called violin hips so do I measure my high hips near the stomach area
I would measure the widest point, wherever that level happens to be for you. And it’s also nice to note the distance between your waist and that level, so you can compare it to the pattern you will use later and get a clear picture of the adjustment you’ll need. 🙂
hurrah! i always wondered why the waist is always too big. now i know FINALLY how to correctly measure hips and fix the clothing and pattern. i’m older and the bottom has sagged and doesn’t come into play with the hips anymore i find.judy
Thank you for this great tip
Oh wow! I have dreaded pencil skirts since my 3rd pregnancy because pencil skirts – although lovely on lady curves – never looked right after baby number 3 came less than 1 year after baby number 2. Even after losing weight, that skin never returned to its rightful place. With age, that skin filled in just like during pregnancy. My tummy always looks like I am 6 months along. Blame it on genetics cause I also have great legs and look younger than my age. Is any one feeling the pain of genetics as they grow older and look like their moms and grandmoms? The biggest issue is that the pencil skirt either pinches at the waist then pokes out or the waist and hips are far too big causing lots of alterations. I have tried adding space along the hips, but as in another comment, the look is bulky and frumpy under the belly. Some curve is good. Very good. So looking at the drawing with the flat board on the belly, I can visualize where to stop the straight dropoff and begin the curve. Even when I was skinny, I had a little belly pouch and loved the pencil skirt look with that little belly pouch. The belly pouch is a lot bigger now, but I can see how to keep the look from going frumpy. Can’t wait to sew the pencil skirt. I always learn from the comments too like the reminder to decrease the fabric under the belly to keep the look from going frumpy but not too much to keep from looking expectant. Going stash busting now. Happy sewing!
Yes! Very helpful. Thanks for posting this.
I totally get why this works and why it is a good idea. I have the utmost respect for Marina’s skills. But for me personally I won’t do this. I have tried it. I am very short, wide hips, smaller waist, little bit of tummy. If I cut the skirt so the pattern front drapes directly off my tummy and straight down and then have the fabric at the side seam draping straight down from my wide hips, ON ME it looks frumpy. I am too short to carry off this look. I have no problem with the fabric cupping under my tummy a bit and pegging the side seams. I feel it is more flattering on my particular shape and actually think its a bit more feminine on my shape as well. Thank you so much for publishing this tutorial. It’s really good. In the end we all have different preferences when it comes to fit and I respect that.
Hi Bunny. I stopped sewing pencil skirts for the reason you explained – the belly dropoff. Your comment helped me visualize how to avoid the frump and keep the curve — which will work for women of all sizes and heights. I suspect my tummy is a bit bigger than yours which means I had a lot of extra fabric under the tummy. I stopped wearing pencil skirts for that reason. I could not sew a decent pencil skirt that actually fit even when I took the “right” measurements. The drawings helped me see where I can begin reducing the fabric as the dropoff begins and creating a gentle curve. Your comment helped me avoid another sewing disaster – and I have made many when trying to sew a pencil skirt to fit my plus sized figure.
This is so interesting! I struggle with this often. How would I work this for my body shape? I carry a lot of weight high on my backside, and low on my belly. So I am very lopsided. I find that my skirts never fit right.
Great article. I think I can apply this to my area from the under bust to waist as well. I am round to my waist, then the waist is a little smaller then larger hips. Thank you.
Genius! you’re absolutely right and you explained it so clearly. Thanks so much for sharing!
This is a very interesting concept. One I will try. My problem is I have a high hip. How would I adjust for this?
Hi Alvena, it doesn’t matter whether you have high or low hip. The idea here is to accommodate the width between the waist and the hip. You’d have to do whatever adjustment you normally need for high hip.
Measuring this way, using my 6″-wide ruler adds1″ to my hip measurement. I’m ok with that if the result is a skirt that falls nicely without pulling in any direction.
An epiphany moment if I ever had one.
Thank you so much
This is great information thanks so much for sharing.
Hi there, I enjoyed learning this method of measuring, however, my mom was a dressmaker/pattern maker, and I remember she would take hip measurements from the biggest butt point to the biggest belly point. Almost at an angle. I am wondering if the end results would be the same as your method.
Hi Lina, your mom’s method would result in a larger measurement for sure. It makes sense to me because she could always take it in if her client wanted less ease. You can always remove but can’t add more. 🙂
Thank you it was very helpful
This article was very helpful, thank you. My question is, how would this method of measuring affect pants/trousers construction. I’m 72 and no longer built to wear straight skirts flatteringly. Pants patterns that fit my hips always end up being way to full in the legs.
Hi Faye, I would use the same method to measure the hips for pants too. Your pant legs being too full is a different issue though. Depending on where it is too full for you, you may need a flat seat adjustment or a thin thighs adjustment. I recommend you Google these terms and see if you have similar fitting issue. I also recommend the book “The Perfect Fit”; it has lots of photos for various fitting issue, and the solutions are concise. Thanks for stopping by!
This has been very useful. I’m interested in the book you mentioned, who is the author please? (I’ve searched and found several different ones ) thank you!
Hi Gaby, you mean “Fundamentals of Garment Design by Bunka Fashion Collage”? There is a link in the post.
Thanks! I meant the book ‘The Perfect Fit’. There are a number of books with this title.
I see. Here’s the link to it on Amazon: https://www.amazon.com/Perfect-Fit-Classic-Altering-Patterns/dp/1589232275
Hello KennisWong, I read your comments, could you please tell me the writer’s name of the book ‘The Perfect Fit’. I cannot find the book on the internet. Thank you very much!
Oh sorry I already found the link!
Great observations! I learned something new about measurements and pattern construction. Glad I came across this on Pinterest!
This is wonderful! Although I just wanted to point something out that I recently learned:
The reason the belly protrudes on women (and some men) is because of the uterus; your uterus leans against your abdomen wall, causing that protrusion. It’s why no matter how hard you work out or how thin you are, you’ll always have that protrusion. It doesn’t really have much to do with weight or posture, though either of those things can make it more pronounced.
Looking forward to using this method in my next pencil skirt! Thank you so much!
Thank you Cheryl. That is very interesting and nice to know.
Brilliant. Thanks soooo much for this information
Celluloid Sheet; Celluloid was a (usually) transparent Plastic; came in substances from the large sheets of transparent wrap that Gift Baskets are put in, through to stiffer material that was cut to make box lids for boxes of Christmas Cards, and even thicker sheet material for things like Rulers. I guess it is kind of superceded by newer ‘Plastics’ now, just as “Bakelite” and other early Plastics have been.
Interesting. That’s what I thought. Thanks for info!
Awesome!!! After doing it wrong for many years, I finally see what I’ve been doing incorrectly. Thanks for the information. This site is an answer to my prayers. Thank you, thank you, thank you!!!
Thank you so much!!! I had my fabric on the cutting table! This is awesome, thank you thank you!
Great – Thanks for this!!!
This is so obvious, now that you’ve pointed it out. I don’t know why I didn’t think about this. Unfortunately, my stomach protrudes way more than it should. Thank you so much for sharing.
This is great, I never thought of this before!! Thanks so much for posting this!
Very clear explanation, thanks!
Actually, I also saw a Japanese illustration showing this. It was from the measurement instruction for So-En magazine which used to be a sewing magazine. I think the mag’s method was always based on Bunka. The older issues didn’t show this, but the ones just before it tranaitioned into a pure fashion mag showed this as the new Bunka method.
BTW I wonder if the cellular sheet is thin rigid plastic used under a sheet of paper to prevent writings from leaving pressure markd on the undersheets. I vaguely remember using those when I was a kid livong in Asia.
I didn’t know about So-En magazine. I know about Mrs. Stylebook, which also is based on the Bunka method (I believe it’s published by Bunka too). I went to a Japanese bookstore and tried to subscribe the magazine, but the store keeper seemed to know nothing about it and couldn’t find it on her system. I wonder if it’s gone.
I know what you are talking about: the sheet that they put underneath the “carbon copy” so it doesn’t copy through when you write. It could be! 🙂
This makes total sense. Thanks.
Ive known how to sew, folliw a pattern, but have been addressing fit, draping and pattern alteration. I am going to do this ASAP. Cant wait. I have a tummy on me. This is very useful info. Makes total sense once you hear it.
Brilliant! Positively brilliant! I always measured the area of the protruding tummy as being the widest part and it worked for me without knowing exactly why.
Excellent description! Thanks Kennis.
Thank You for the information. I can’t wait to try this on my next pant or skirt.
Just found this excellent illustration and explanation on Pinterest. It probably explains why side vents on tunic tops are so popular–they are more forgiving to the various bulges most women possess. Thanks!
You have a way with words … excellent explanation! Thank you so much for sharing!
Love this article!!! Thank you so much for sharing!
Celluloid is an early plastic
This is a technique I will also use when I sew dresses! It’s a totally new concept to me and one I expect to use often. Thanks!
This technique would also be helpful for those who have protruding front thighs, but flat stomach. You can tell the abdomen is accounted for, but there may be a hollow or pulling at the point below the front of the crotch. Darting would manage the extra fabric in the abdominal area while allowing for gliding over those curved athletic thighs!
Hi Mary, I think the idea of measuring protruding thighs would be similar, but then the “hips” would be lower, and you end up putting the board on the rear end to capture the comprehensive “hips” measurement. I think the paper device that Marina from Frabjous Couture created would better capture protruding thighs since it extends the cardboard front and back all the way around the waist, hips and below to do the measurement.
I think Marina from Frabjous Couture took the idea from a russian method by Galiya (www.galiya.ru), she uses a sturdy paper sheet to wrap the abdomen and hip area and mark the measure in it. She also has developed some other rulers to measure the darts properly. Her method is hard to use because it involves a lot of calculations but it’s the most exact that I have never used. The only drawback is that it is explained only in Russian language!
Yes, Eva. That’s a good way to put it: more exact but harder to do. I’ve done the paper sheet too, but I found it very hard to make everything perpendicular to the floor. Maybe with a measuring buddy, that will be easier. Thanks for the name of the author. I don’t read Russian either. 🙂
I love that you’ve explained this so well and can enjoy the reading with out all the advertising pop ups people are using! You are right on the mark, thank you!!
Never have I thought about this. I chalk everything up to substandard sewing skills, and the Goodwill gets another pencil skirt. THANKS!!
Thank you so much for this. I have typical middle aged spread/droop and I am just learning to sew. I have found the fitting to be the most difficult skill to learn. (I already quilt) This helps a lot!
I was using a more complicated variant (measure widest belly side to side then add widest buttock side to side) but this is so simple and uncomplicated. Love it!
Also a very good idea especially if you use a board or ruler so thighs are included with belly too! Thanks -Sylv in indulgence city holiday site!!ha ha
very useful! thanks
lilac laces design
Bravo- and thanks!å
A very good point and a great explanation. Thanks for sharing!
I am going to try this tonight. This post is super helpful, thank you so much!
Wow Kennis!
You never fail to impress with your knowledge!
So helpful!!
You are a genius!
Very helpfull, thanks, this was my exact problem!
Thank you Kennis! I probably needed to do this when I made the Petal skirt. I will remember to use this technique next time I need my hip measurement.
Great advice. I am going to have to try measuring this way. Thanks for the great explanation.
I want to re-do Sandra Betzina’s pant course with this in mind…..
I believe a Celuloid Sheet is a thick overhead transparency sheet. I’m not 100% but that’s immediately where my head went. It may also be the laminate stuff we apply to countertops.
Fabulous, thank you!
Such a great explanation 🙂 I’m now imaging using a great big piece of flimsy cardboard to wrap around myself to create a cylinder that acts as the board both at the back and front (because it doesn’t matter front/back where you put that board) and then just measure that.
We need measuring tapes that are stiff and as wide as your 6×24″ quilting ruler, I’m guessing 6″ would be enough.
Oh I am very thankful you wrote this. Very interesting 🙂
You’re the best Kennis! Such clear diagrams. Now I need to try on all my skirts and see if this happens…
Thanks, Kennis – Great information and explained so well – you do have the gift of clear explanations!!
Hallelujah. My hubby says I look like my bum was cut off and attached at the front. This makes complete sense. I put off making skirts as I have never known how to get over this problem. Thank you K xXx
So glad it gives you some idea, Karen. Cheers.
I swear that one night a few years back, I must have rolled over in the middle of the night and my bum forgot to come with me. Since then, it’s been on my belly!
I love this! I’m wondering how this would impact pants or jeans. I have 2-3″ of protruding belly, but I don’t think I want that extra fabric in my crotch curve…what would you say is the best solution?
I personally prefer to lower the front for pants/jeans. As long as my back is high enough, I don’t feel that my pants will fall off. It’s not a good look for me to have the waistband over my belly.