
How to Get a Great Shoulder Fit: Narrow/Wide Shoulder Adjustment
If you think that Itch to Stitch’s patterns fit me perfectly out of the file, you would be incorrect. I don’t use my own measurements to draft the pattern. Just like everything else in life, it’s not always all about me. Since I develop the patterns for different women, it makes sense for me to use some sort of “standard” measurements. I use the ASTM standards for Adult Female Misses Figure Type, which are used by many apparel manufacturers. According to ASTM, these standards “assist manufacturers in developing patterns and garments that are consistent with the current anthropometric characteristics of the population of interest.”
However, we already know that standards does not mean that they fit everyone out of the gate. These standards where developed using many women’s measurements, and the measurements are averaged for each size. If a certain measurement happens to be spot-on for you, congratulations!
For me, the fit is not too bad, but I do have to adjust for my shoulders slightly. In fact, it’s customary for me to widen the shoulders for many brands of patterns.
I often refer people to the Curvy Sewing Collective’s shoulder adjustment tutorial. Whether you consider yourself to be curvy, this tutorial is very detailed and useful. In fact, it is equally applicable whether you are slim or curvy.
However, there’s more than one way to skin a cat. And I actually use a different method. I think it’s slightly easier. Try both and tell me what you think!
Do You Need an Adjustment?
But before we jump into the adjustment, let’s talk about whether you need the adjustment.
Your shoulder joint is where your shoulder ends, and that’s where the shoulder seam should sit. When you raise your arm, and there’s a depression where your shoulder joint is. You can see this depression better if you raise your arm not directly to the side, but rather, half way between your front and your side.
And of course, you will need to make a muslin to see whether the garment’s shoulder seam is on top of the shoulder joint.
Note that some garments are not meant to have the shoulder seam on the shoulder. There are plenty of designs that have the shoulder seams sitting inside. On the contrary, the seam of a dropped-shoulder design is supposed to fall off your shoulder.
Also, if your shoulders are slightly narrow, you may want to consider using shoulder pads. I am not talking about big football player shoulder pads in the 80s, but something thin and inconspicuous. Our garments don’t need to fit our shapes exactly, instead, ideally they should make us look the way we want to look. I often wear dress with a waist that is slightly higher than my natural waist, so that my legs look longer. There’s nothing wrong with that. If you think small shoulder pads would make your shoulders look broader, and that is what you want, then go ahead and include them in your garments!
Narrow/Wide Shoulder Adjustment
If you decide that the shoulder of your garment needs to be adjustment, then let’s begin!
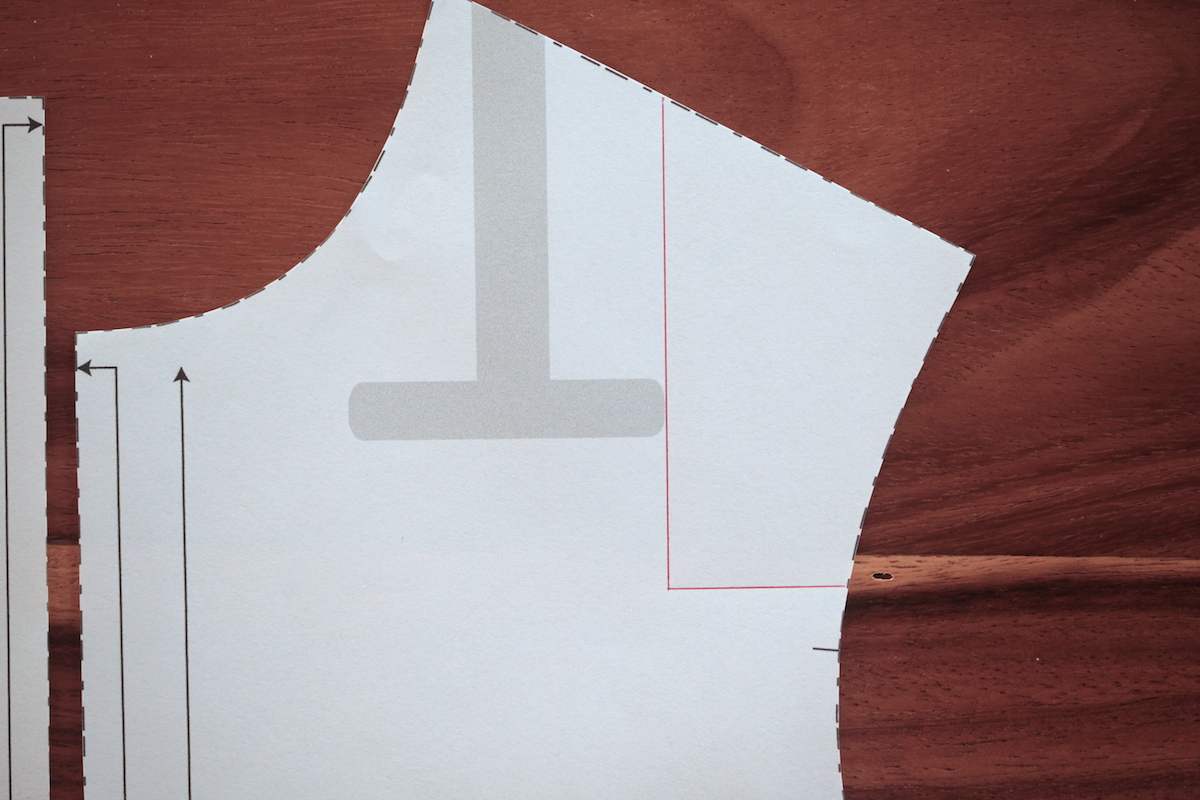
At about the half way point of the shoulder, draw a line that is parallel to the grain line. And then at a right angle, draw another line perpendicular to the first one. The second line should be above the armhole notch. The exact position of these lines are not awfully important, as long as they are roughly where I describe them to be.
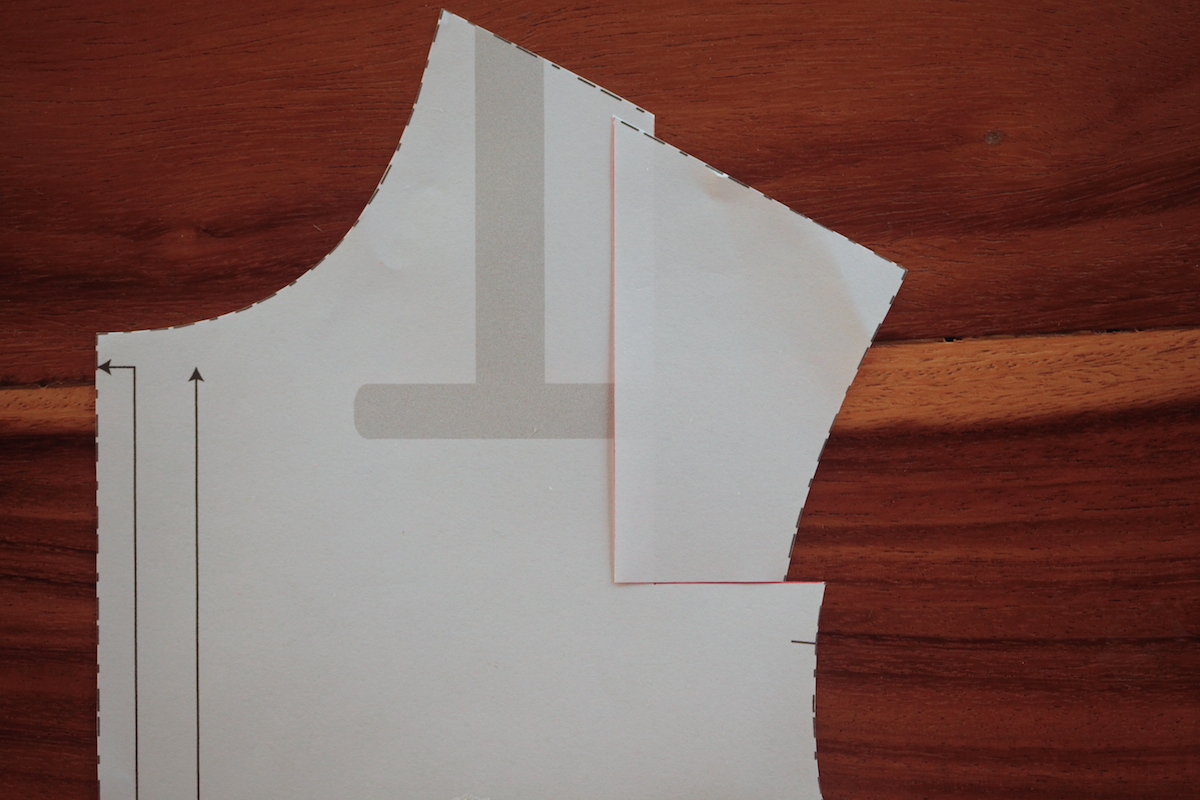
Cut the pattern on these lines. For me, I need to widen the shoulder by 1/4″ (6 mm), so you see I move the cut piece to create a 1/4″ (6 mm) gap. Notice that the gap is the even from the top to the bottom, and the bottom of the cut piece is still perpendicular to the grain line.

If your shoulders are narrow, and you need to do a narrow shoulder adjustment, then you would overlap the piece as such.
The processes of the two adjustments are the same. Let me proceed with the wide shoulder adjustment. I tape the pieces to a piece of paper.
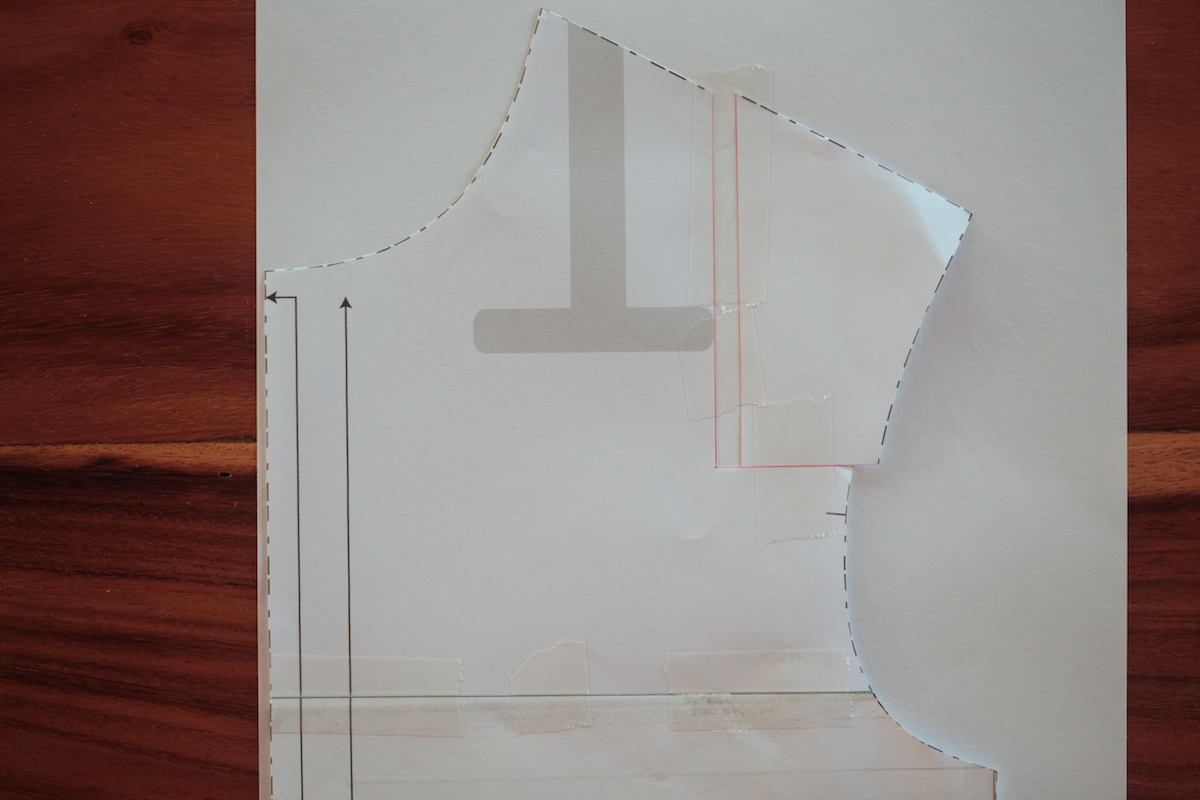
Even out the shoulder by drawing a line from the beginning to the end of the shoulder.

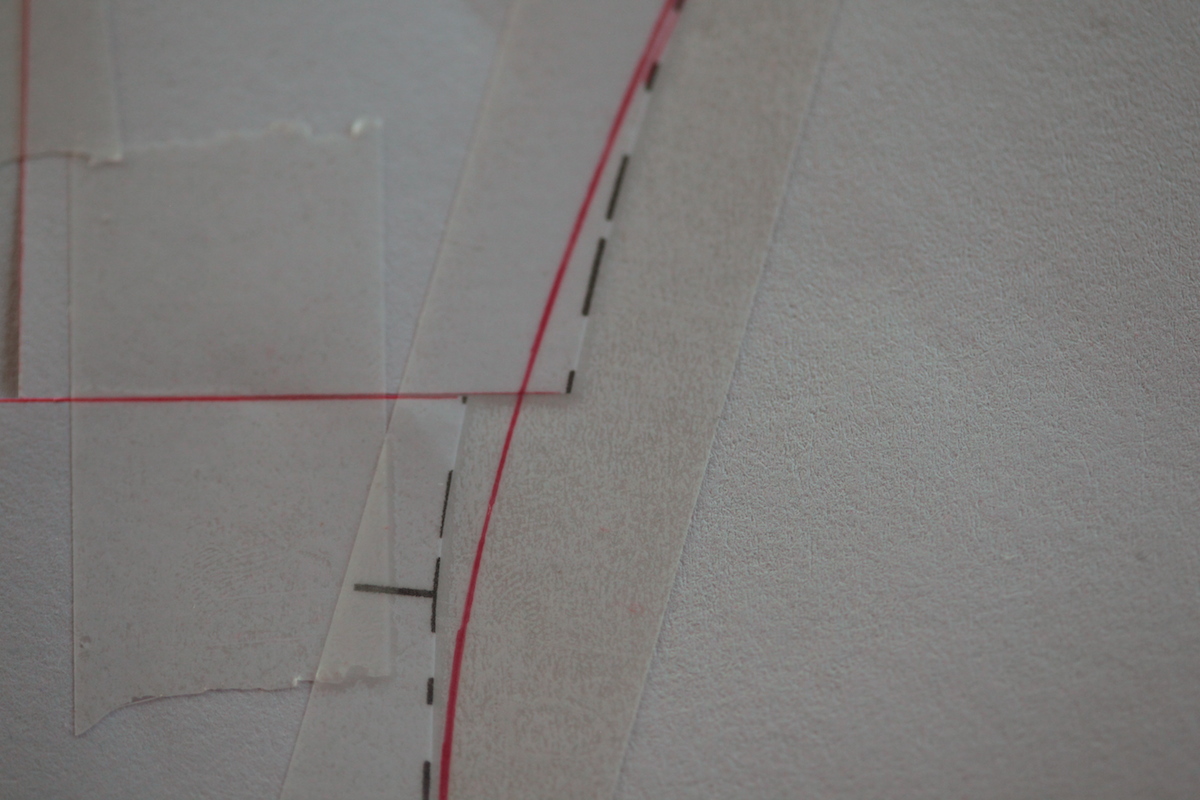
For the armhole, draw a curved line to transition the armhole from one to the other. You can certainly free hand this curve if you don’t have any appropriate ruler, but make sure that the transition is very smooth.
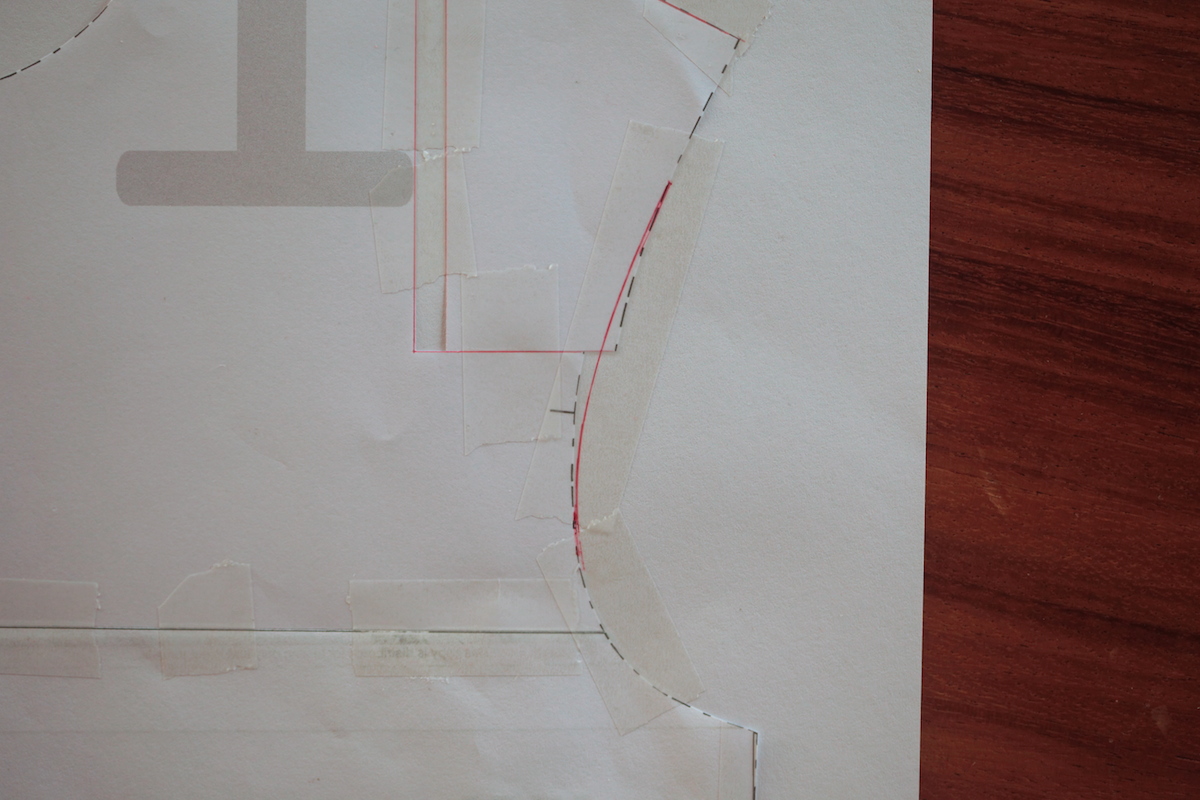
Lets zoom in a little, you see that in order to draw the curved line, some part of the pattern is cut off while some part is added. The ideal position of the curved line is midway of the jog.
Then you repeat the same process for the back piece. The shoulder seams will need to be stitched together, so you will do the same amount of adjustment for the front and the back shoulders. You don’t need to make any changes to the sleeve.
Cut out your pattern and you are done. Let me know how it goes!

Can you comment on how to determine whether a person would need a narrow shoulder adjustment or a narrow back adjustment. Thanks in advance!
On a regular sleeve, the seam is supposed to the at the shoulder joint. If the sleeve falls off your shoulder, then you need a narrow shoulder adjustment. Yes, that does mean you will need to make a muslin to test first. If you determine that you need a narrow shoulder adjustment on one Itch to Stitch pattern, that usually means you need one for all other Itch to Stitch patterns with a regular sleeve as well. Note that some of the designs don’t have a “regular” sleeve, meaning they are designed to have dropped shoulders or narrow shoulders where the seam is set inside the shoulders. In those cases, you are less likely to need to make a narrow shoulder adjustment because there’s more wiggle room on those designs. So read the descriptions (or look at the photos; you can easily tell when it’s a dropped shoulder design).
My Shoulders are narrow & sloping. Will this adjustment correct the slope as well as the width? Thanks.
Hi Donna, no, this tutorial is only for narrowing, not changing the slope. Narrow shoulders don’t necessarily indicate the shoulders are high or low (I have a tester who has very high, but narrow shoulders). If you want to change the slope, you can move the entire armscye up or down accordingly.
Muslin with sleeves attached fits ok until I reach forward with both arms, then it pulls across the back shoulders. Where do I need to add ease?
You need to look at your back width and the bicep width. Google “broad back adjustment” and “full bicep adjustment”.
Late to the game here, but I’m wondering how you figure out how much you need to narrow the shoulders by? Do you measure the width from your shoulder to shoulder and compare that to the pattern? Thank you!
Essentially, you make a muslin and check the fit. That’s the most accurate way. It’s hard to just measure your shoulder because even if you know where to measure from, you don’t know how far from the neck the garment is designed to be. But once you know that you always adjust a certain length for a brand of pattern, then usually it’s pretty consistent that you have to make the same adjustment.
Hello,
I just discovered your tutorial, which is the one I’ve been using for a very long time now.
However, I always need to remove a bit more than 1 inch to every pattern I have since the shoulder seams are too long.
But when I remove this (big) excess, I always find that the back piece are a bit smaller after I reduced the shoulder seam and retraced the curve of the armhole…
Also, since I need to retrace the shoulder line seam, it is lowered quite a lot so is it a problem (I never notice it since I sew only big gathered sleeves thoug) ? Should I keep the original shoulder line ?
Thank you in advance for your reply ! ^.^
Hi Emelia, if you keep the original shoulder line, then the armhole will be a bit bigger. It will depend if the sleeve has ease that can be fitted into the larger armhole. I think if you are making a knit garment, the stretch should make it OK. If you are sewing big gathered sleeves, that should be OK too; you just adjust the gathers accordingly.
Thank you very much for your comment ! However, I never sew knit but the puff sleeves, yes ^.^
What about the fact the back seems smaller after I retraced the armhole line ? Is it an idea ?
Thanl you in advance ^.^
Hi Kennis, the shoulder seam on my pattern is very slim (less than 2”) and I think I need to narrow the shoulder by an inch… would it be logical to draft a new pattern piece that adds more fabric towards the neckline (in this case, a v neck). Thank you!
Hi Georgina, I would cut a rectangle that includes the neckline in your case. When you move the rectangle inward, then you are also adding to the neckline as a result.
Gosh, thanks for getting back to me so quickly! I think I understand what you mean… I will give this a go!
Hi, I have a very narrow shoulder and would need to adjust as you described. I also want to thank you I finally understand this. My question is do I add the same amount that I removed when narrowing the shoulder onto the sleeve cap or do I not do this?
Hi Barbara, you don’t have to do anything to the sleeve.
Hi Kennis,
Thank you, for this very helpful instruction. I would normally do a forward shoulder adjustment and am thinking I could also benefit from a narrow shoulder adjustment as well… would you do the narrow shoulder prior to the other, what do you think?
Hi Sally, I think either order would work. I don’t think you save any time by doing one or the other first. And the end results would be the same.
Worked like a charm Thak you!
If I do a wide shoulder adjustment, does that make the arm hole bigger as well? I find the seam that should be on my shoulder is too close to my neck, and the arm holes also tend to be too tight. So if I do a wide shoulder adjustment do I also need to adjust the arm hole to accommodate both?
If you are only doing a wide shoulder adjustment according to this post, then the armhole is OK without further adjustment (besides smoothing out the seam line). But if the armhole is too small, that’s entirely another issue. You can adjust the small armhole by dropped the armscye down, but you will also have to adjust the sleeve (assuming it has sleeves) as well.
Thanks for this great visual explanation. I am just wondering, is it possible to use this technique to narrow the shoulder WITHOUT lowering the end of shoulder? I have a pattern in which the shoulder height is fine, but needs only narrowing. And if I can do that, would I then need to adjust the sleeve?
Hi Dayna, this method doesn’t actually lower the shoulder. That’s why you can use the sleeve exactly as is. If you need the shoulder to be higher, you just move the rectangle up. But you may need to raise the sleeve cap accordingly.
Thank you for this – it looks easier to do than others I’ve seen and I’m going to try it tomorrow.
Very useful! But I’ve got a question about doing a wide shoulder adjustment on your Mila shirt. With the ‘over the shoulder’ yoke, I’m trying to get my head around how to adjust it. I’ve got a few ideas, but am just not sure.. Can you offer any advice?
Thanks!
Hi Karen, the concept is very similar (in fact, easier). You would cut out one longer rectangle that spans both the front and back, and you move the tall rectangle outward as one unit. The rest is the same. Good luck!
Your explanation and photos are great. Looking forward to trying one or the other…how can I tell if I have narrow or wide shoulders? I seem to have an issue with extra fabric and gaps in the upper back area, but I’m always tugging at the sleeves. Please help.
Thank you for your help.
Hi Denise, if your shoulder seam is at the shoulder (as described in the post), then you don’t need this adjustment. You may have broad back, round back, but it’s hard to say with a one-line description without any photos. I suggest you Google these terms “broad back adjustment” and “round back adjustment”, and see if there are any photos that match your symptoms.
Quick response and just the right information. After reviewing both issues and adjustments I believe I’ve got the round back as well as a bit of sway back. I’m hoping to try this adjustment ASAP! Thanks so much for your advice and I’ll definitely return to your sight. 🙂
Thank you so much for this! I’ve been putting of actually cutting into my fabric because I was worried about this. Ready to wear clothes are almost always too narrow for my shoulders and I didn’t want the same in hand-made, but had no idea what to do about it.
I am glad to hear! I hope you can get a good fit.
Great Tutorial, what is the best way to narrow a shoulder on a ready made garment with a sleeve?
Hi Ann, it is possible to narrow a shoulder on a ready-made garment. Take off most of the sleeve (you can leave the very bottom attached) and apply a similar principle by shaving the outer shoulder a bit, and transaction the cut line back to the original armhole. It’s not EXACTly the same as doing it on the pattern (since the shoulder slope changes when you do it on the pattern piece), but if you are not doing a huge adjustment (let’s say 1″ is still a fair game), then it’s not very noticeable. You don’t have to do anything to the sleeve itself.
Will the top of the sleeve cap and sleeve seam need to be adjusted?
No, it’s not necessary. The change in length of the seam line should be minimal and can easily be eased with the existing sleeves.
Thanks, Kennis – I will try this way next time I need it!