Proper Placements for Buttons & Buttonholes
I always thought the positions of button and buttonhole are pretty self-explanatory. But more than one occasion, I have seen buttons that were placed a bit too close to the edge of a garment. I haven’t seen anyone discussing the topic in a blog post, so I thought I could contribute a little to the world of button and buttonhole placements.
Size Matters
Let’s talk about size. The rule of thumb is that the buttonhole is 1/8″ (3 mm) bigger than the button. Hence,
- 1/2″ button uses 5/8″ buttonhole (1.25 cm button uses 1.6 cm buttonhole)
- 5/8″ button uses 3/4″ buttonhole (1.6 cm button uses 1.9 cm buttonhole)
- 3/4″ button uses 7/8″ buttonhole (1.9 cm button uses 2.2 cm buttonhole)
So on and so forth.
If your button is big (such as 1 1/2″ or 3.8 cm), then you could add 1/4″ (6 mm) instead of 1/8″ (3 mm).
Note that the size of the buttonhole is the actual opening. It doesn’t count the little bars before or after the actual hole.
Button Placement
From a design perspective, you could put buttons anywhere you’d like on a garment. But let’s talk about center front buttons as in a button-down shirt. I guess that is the most common placement of buttons.
In a button-down shirt, the buttons are placed in the center front. That makes perfect sense, right? You want the buttons to be exactly where the center is, not a little skewed to the right or a little skewed to the left (unless that’s the design element).
I may be Mrs. Obvious here, but only after spelling out the fact that center-front buttons are placed on the center front, then you can start to place the buttonholes accordingly.
Vertical Buttonhole Placement
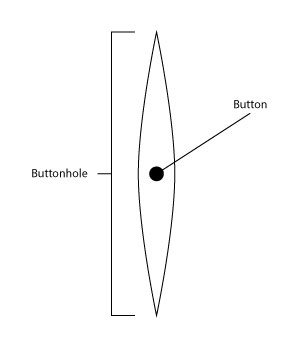
When making a vertical buttonhole, the button should be sewn in the very center of the buttonhole. That means the length of the buttonhole is on the center front too in the case of a center front button down shirt.

Note that the black dot is not the entire button; it is just where I would sew the button on the corresponding side.
Horizontal Buttonhole Placement
A horizontal buttonhole, however, is different. We already established that the button is sewn on the center front. So now it’s a matter of how we place the corresponding buttonhole.
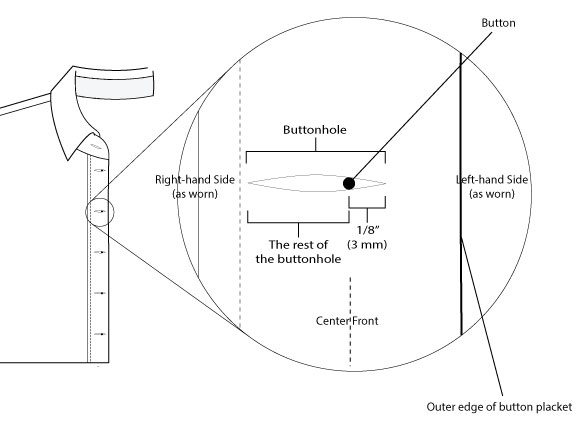
The buttonhole is not centered over the button; it is back off from the center front.
Specifically:
- the buttonhole start 1/8″ (3 mm) from the button (toward “Left-hand Side (as worn)”).
- the rest of the buttonhole is at the right-hand side (as worn) of the button. For example, if your buttonhole is 3/4″ (1.9 cm), then 1/8″ (3 mm) is on the left-hand side of the button and 5/8″ (1.6 cm) is on the right-hand side of the button.
This makes sense because when you wear your button-down shirt, you will be moving around. Naturally, the front of the shirt will be pulled open until it is stopped. With this placement of the buttonhole, the button will not appear to jump out of the edge of the placket after moving around.
Hope it helps!
Happy sewing!


So helpful-thank you! I’m sewing a pj top that has vertical buttonholes. I have never sewn them before, so I needed some clarification on where to place the buttons.
Hi,
Just a comment on shirt terminology.
A shirt with buttons can be a button-front or a button-up shirt.
A button-down shirt normally refers to a shirt with a button-down collar, two little buttons hold down the points of the collar.
Nice to have more info on button placement for shirts and blouses.
Thank you.
Many many thanks Kennis Wong
Thank you so much for sharing this information
So very kind of you 😀😀😀
Thank you for this! The last point about the horizontal buttonhole helped me out!
Should the buttonhole on boys’ and menswear always be vertical? I am making little boys’ shirts and the pattern shows horizontal buttonholes (no placket). If they’re horizontal, I assume your references to right and left would be opposite for a boy’s shirt.
Hello!
Thank you for the explanations!
I wonder what the rule is for choosing vertical VS horizontal holes is… I made a v-neck dress with a placket, but there was no instructions on buttonhole sewing. The packet curves smoothly above apex, so I have room to put one button above the apex button.
Thank you!
It’s more typical to find buttonholes at the center front to be vertical. That way, you don’t have a front that “expands” as you move. However, the top button at the neckband for a shirt is usually horizontal. I suppose that allows that part to expand.
I just found your explanation for the horizontal button. Thank you. It cleared up my question about why the center line is not in the center of the button hole. Your explanation saved me a lot of angst. I talked with someone on the Simplicity help line and they were not helpful at all!
As a Pattern Maker from the apparel industry, a vertical button should be stitched at the top of the buttonhole to prevent hi-low, especially at the upper edge. The buttonhole side shifts downward to be stopped by the button. Formula for figuring the distance from the top edge is about 1/4″ + 1/2 of button width, depends on width and thickness of button.
Sigh… this is in direct contrast to the article above that stated horizontal buttonholes get buttons sewn in the middle of them. So you’re saying it actually is correct for them to be sewn towards the top of the buttonhole?
I’m trying to finish my sons shirt and cannot find a straight answer on this! Lol. I guess I’ll do it this way and see how it goes and if I have to fix it then so be it.
What about replacing buttons with larger ones? How do I make the buttonhole bigger too? Can I just put a bigger hole over the original one?
Hi Dede, thanks for stopping by. There’s another post on this very topic 🙂
https://itch-to-stitch.com/button-placket-adjustment-larger-buttons/
Sorry. I was not very clear. Dress is already made with buttons. I want to replace them with bigger ones. Trying to figure out enlarging the preexisting buttonholes. Thank you!
If the dress and the buttonholes are already made, then you have no choice but to use only buttons that will fit the buttonholes. I can’t think of a nice way to enlarge the buttonholes and still look good.
yes! you can make bigger buttonholes over the old ones. but it is better to do it with a buttonhole machine or use the buttonhole stitch of your machine instead of a tight zigzag stitch. secondly, the enlargement should be towards the inner part of your garment rather than the outer edge because if the buttonhole is too close to the edge it will look terrible and may not last before it breaks open. finally, you should try to stabilize the back of the fabric with another small fabric (matching) or an interfacing in other to keep the old hole shut before expanding the hole you may trim the excess fabric or interfacing out afterwards.
Thank you so much! It sounds very common-sense, but I will save this link to review when I get around to making that button-down shirt on my list!
You explained nicely what I had to figure out by trial and error regarding horizontal buttonholes.
Being inquisitive makes our sewing so much more fun.
What’s the best way to determine buttonhole placement to prevent gapping on a front button down garment?
Hi Carol, I am going to tell you what I have been doing. I put on the shirt, mark the level where the apex is. I put a button there. At the top of the placket, the top of the top button is 1/4″ below the collar. Then I decide how many buttons I need in between the apex level and the top button and place those buttons evenly. Smaller sizes may only be able to fit 1 button in between, but larger sizes might need 2. And it also depends on the button size too. Then you continue that spacing for the buttons below the apex level. That is a pretty generally accepted way to do it. However, I do want to mention that Claire Shaeffer (in case you don’t know, she is a well respected couture sewing expert – and who am I to argue with Claire Shaeffer) said that there’s no need to place a button at the bustline to prevent gaping; she said “The button locations should be determined by the number of buttons and the locations of the top and bottom buttons. If the garment gaps at the bustline, the front is too small.” Hope it helps. 🙂
Thanks so much!
Thank you for this help!!!