
Tutorial: Jetted Pocket/Double Welt Pocket with Flap
I received a special request to do a tutorial on a jetted pocket. I found that the term “jetted pocket” is not used very often in the at-home sewing world. It is more used in the men’s tailoring world, especially in the UK. The more common term in the sewing world is double welt pocket (although some just call it welt pocket, which is confusing because you could have a single welt pocket). However, I think the requestor wanted to learn about the double welt pocket with a flap, because she actually showed me a photo. So there you go! You ask and you shall receive!
I am going to call it a double-welt pocket with a flap, because that’s the term I am used to.
The double-welt pocket is a more formal pocket. You can usually find it on tuxedos. For some reason, when adding a flap, the pocket becomes less formal. You can find the flapped version on sports jackets. Regardless, the jacket is usually lined, so the inner structure is hidden behind the lining. There are lots of debates about what pocket should go with what lapel for what occasion in the men’s jacket world. But I believe that you should do whatever you like. We are not in the era that the king or the queen tells us what we can and can’t wear. If you want to put your double-welt pocket on your pajamas, you don’t need my permission!
As with any welt pockets, precision is paramount. It’s not necessarily difficult though. You go through the exact same motion every double-welt pocket you make. So after you conquer one, you can make another 99 of them with the same result. With your first one, be sure you are not in a hurry. Feeling exhausted for the day? Maybe rest first and be sure you have the concentration necessary to tackle it.
Let’s begin by determining the size of the pocket. To be functional, the width of the pocket for a lady should be at least 6 1/2″ or 7″ (16.5 cm or 17.8 cm), so that the hand can be comfortably put through the opening without stressing the corners. For a man’s pocket, the ideal would be 7 1/2″ to 8″ (19 cam or 20 cm). My particular opening here is 7″ (17.8 cm) wide.
I am using a 1/4″ (6 mm) seam allowances on the most part unless otherwise noted. There’s a reason for this and I’ll explain below. To be clear, when I say “width”, I mean the horizontal measurement, when I say “length”, I man the vertical measurement. I am only making one pocket below; you are likely making two, so double all the pieces.
Here is the lineup of the pieces you will need.
The jacket (or coat, pants, pajamas etc.) – This is the place where the pocket will be on. For simplicity’s sake, I’ll call it the jacket. If there is any dart behind the pocket, you need to sew it first.
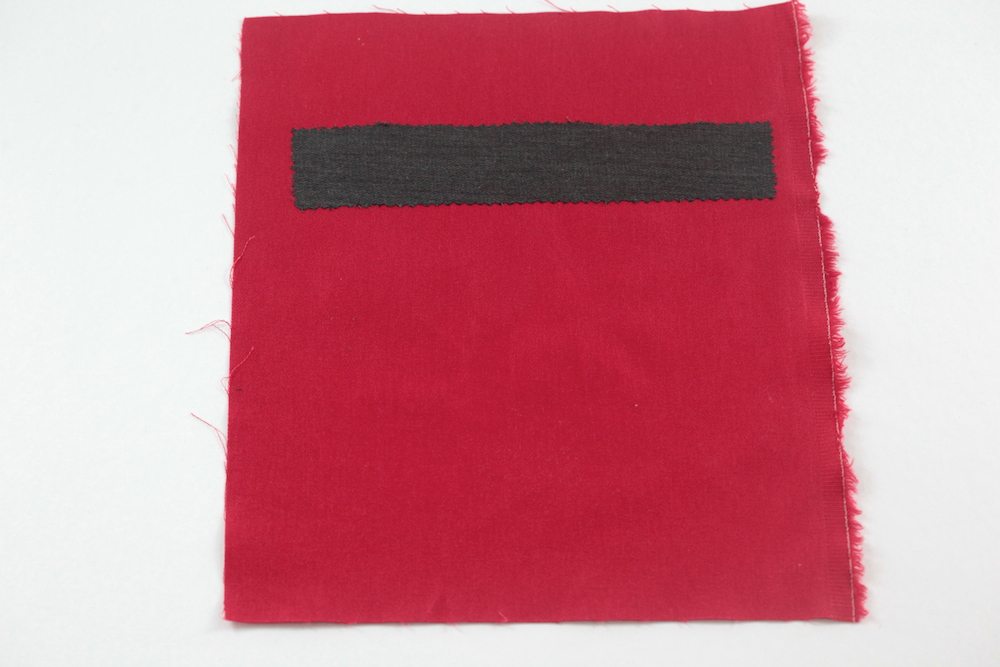
Fusible interfacing for the wrong side of the jacket – Cut a strip of fusible interfacing that is 2″ (5 cm) wider than the final pocket width and is 2″ (5 cm) long. In my case, with 7″ (17.8 cm) wide opening, the dimension of the fusible interfacing is 9″ x 2″ (22.8 cm x 5 cm). This is a woven interfacing. A weft insertion one will work too.
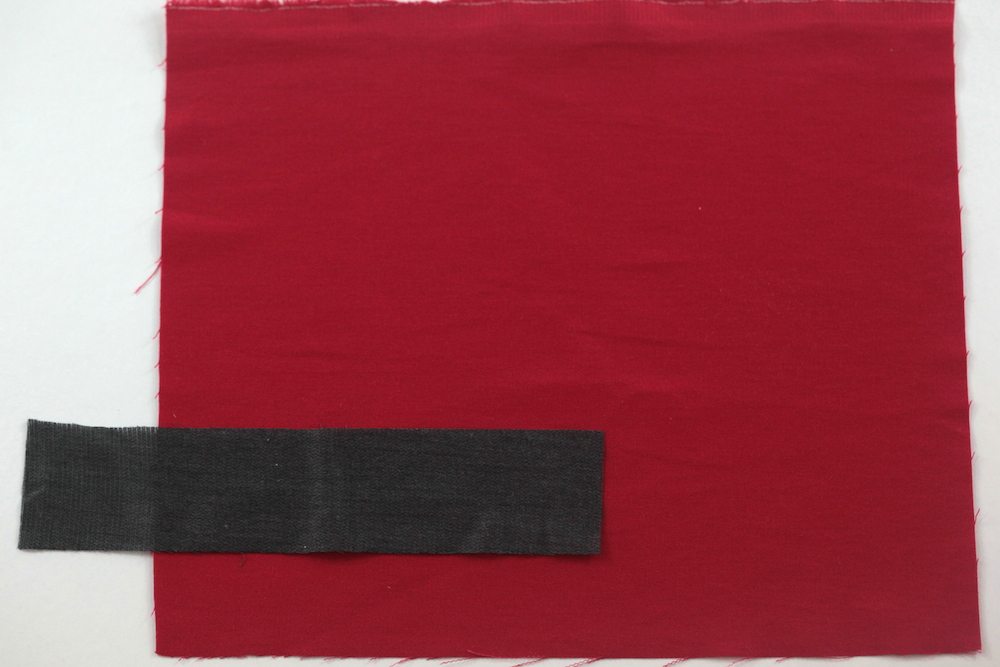
The red fabric is my “jacket”. You need a strip of fusible interfacing that is 2″ (5 cm) wider than the pocket opening by 2″ (5 cm) long.
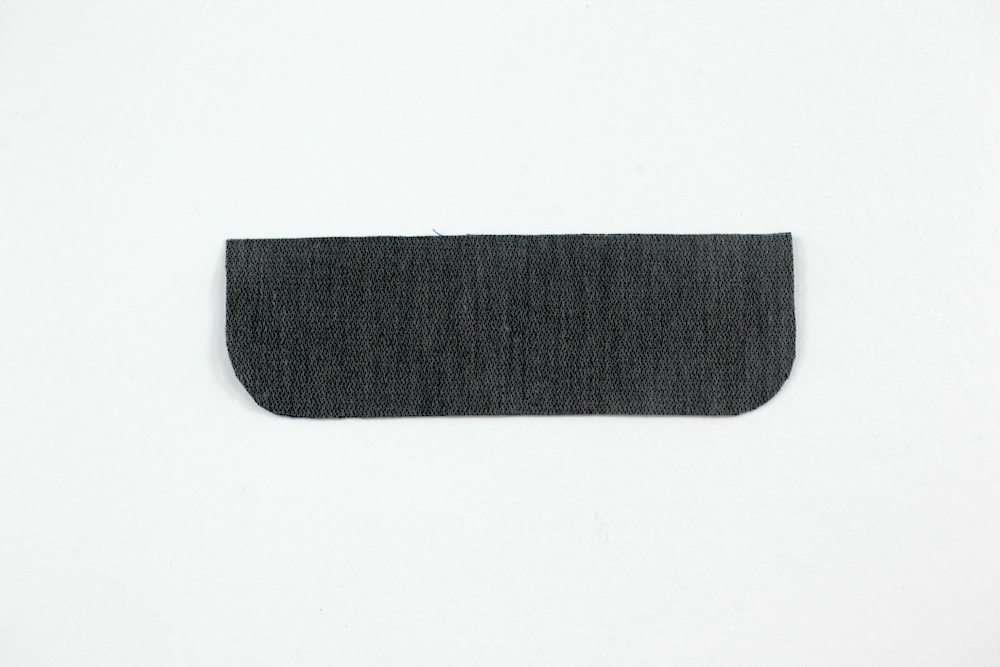
Flaps – Three pieces of flap: one outer fabric, one lining fabric and one fusible interfacing. The width of these pieces should be the wide of the pocket opening plus 1/2″ (1.2 cm), which are the seam allowances (1/4″ or 6 mm per side). The length of the flap is somewhat up to you. In this case, mine is 2″ (5 cm) plus 1/2″ of seam allowances. I also rounded the bottom corners because I think that is pretty.You could have squared corners too. The upper corners will be inside the jacket, so there’s no need to round them.
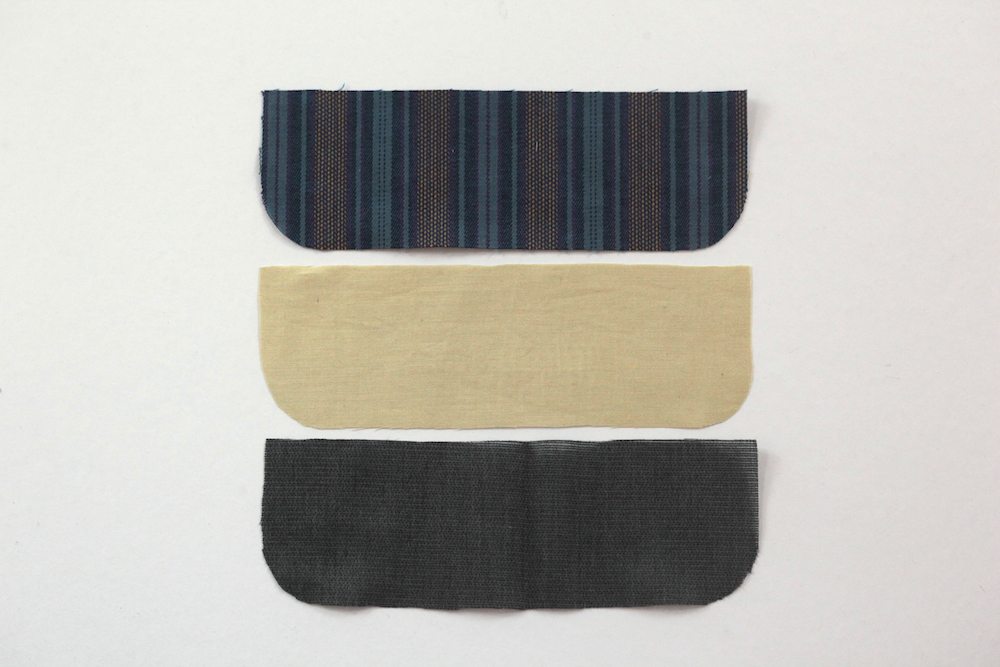
The strip is the outer fabric; the yellow is the lining and the black is the fusible interfacing. They have the same dimensions.
Welts – Since this is a double-welt pocket, naturally, we need two welts. Each of my finished welt is 1/4″ (6 mm) long. You could have them longer, but I don’t recommend having them shorter, because that will be a bit difficult to handle. The fabric piece you need for one welt is 2″ (5 cm) wider than the pocket opening and the length should be the length of the finished welt times four. In my case, the fabric piece dimension of one welt is 9″ x 1″ (22.9 cm x 2.5 cm). And I need to cut 2 of welt fabric and 2 of fusible interfacing. You can use the same kind of fusible interfacing as above.
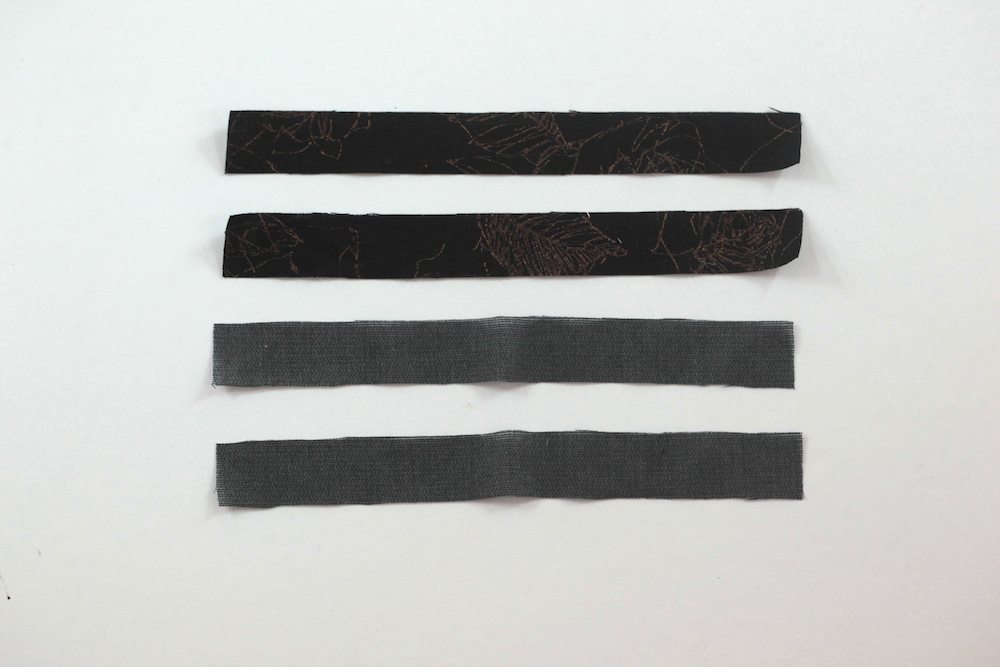
Cut 2 of the welt fabric and 2 of fusible interfacing.
Pocket bag – You will need two rectangles to make one pocket bag. Use the same width as the welt (pocket opening + 2″ (5 cm) ), and the length should be at least the finished length of the pocket plus 2″ (5 cm). I am actually not too concerned about the lengths of these pieces because I will trim them at the end. In fact, the final length of the pocket will often depend on where I put the pocket. I like to be able to touch the bottom of the pocket when I wear the jacket. So for now, it’s good to overestimate the length a bit.
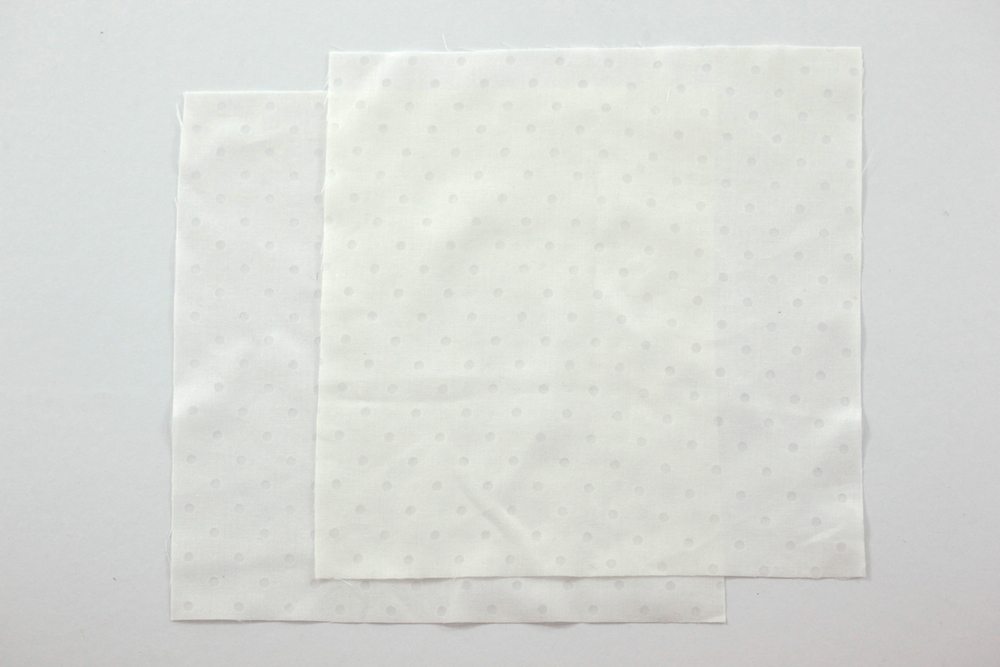
Two rectangles for the pocket bags. Use the same width as the welt and leave the length pretty long. They can be trimmed at the end.
These are everything you need to make one double-welt pocket with a flap.
Now heat up your iron and apply the fusible interfacings. You need to mark where the pocket is on the wrong side, as well as the right side of the jacket. I am using a heat-erasable marker, so I am marking the wrong side first so I know where to fuse the interfacing, but I’ll have to mark the right side again. I use my pinking shears to trim the interfacing so it makes less of an impression. Fuse the interfacing on the wrong side centered over the pocket opening.
Fuse on the wrong side of the jacket, centered over the pocket opening.
Apply the flap interfacing on the wrong side of the outer flap.
Apply interfacing on the outer flap.
Apply the welt interfacings on the wrong side of each welt.
Apply interfacing on the wrong side of the welt.
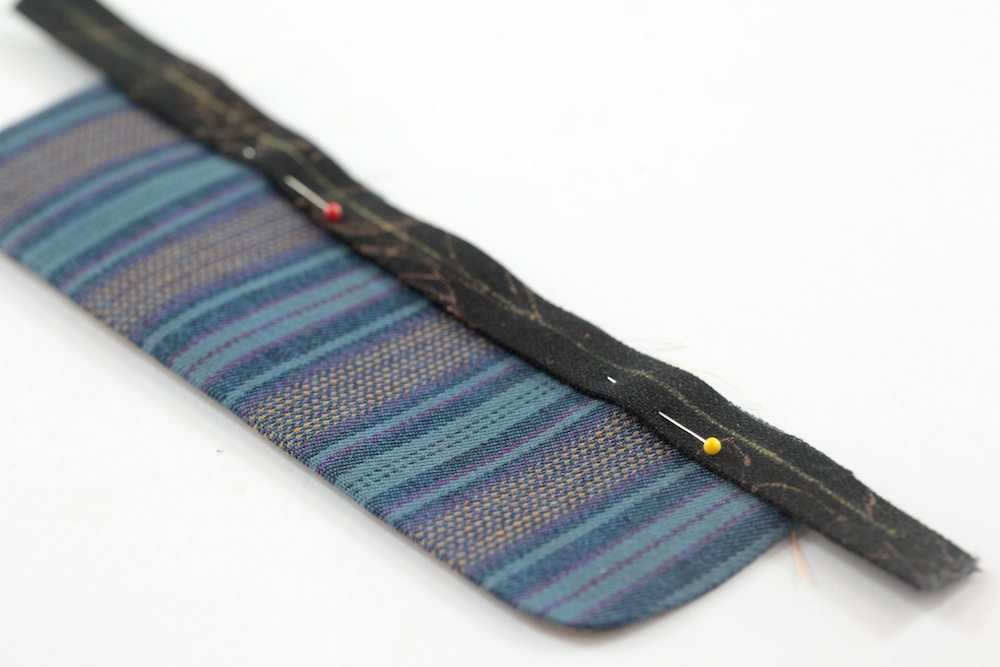
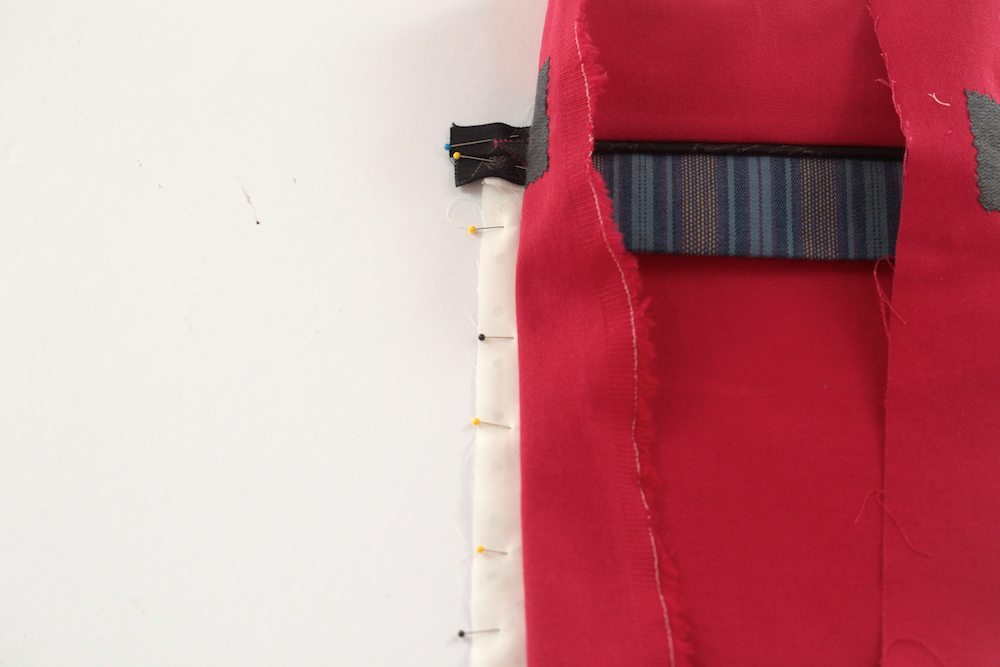
Let’s construct the flap. With right sides together, pin the lining to the outer flap. What I’d like you to do is to “offset” the side and bottom raw edges by 1/8″ (3 mm). What “offset” means is to have the lining hanging 1/8″ (3 mm) beyond the outer flap. The idea is that when the flap is turned right side out, the seam will slightly roll to the inward facing side due to the fact that the lining is now smaller, so that it is not visible from the outward facing side. You can achieve the same result by trimming the lining 1/8″ (3 mm) on the sides and bottom, but I think this is a better way to go because trimming such a small amount is finicky. I use this same technique in Marbella Dress too. With this technique, you will have a “bubble” in the middle of the flip before turning. Kenneth King uses another ingenious method in his book Cool Couture (affiliate link) to hide the seam allowances from the public view. He leaves the three edges (sides and bottom) as folds – imagine you have an envelope, the kind that you use for greeting cards. The “seams” of the envelope are in the back. However, his method would only work if the corners are sharp (not rounded).
The lining of the flap is offset by 1/8″ (3 mm) on the sides and bottom.
Because of the offset, the middle of the flap has a “bubble”.
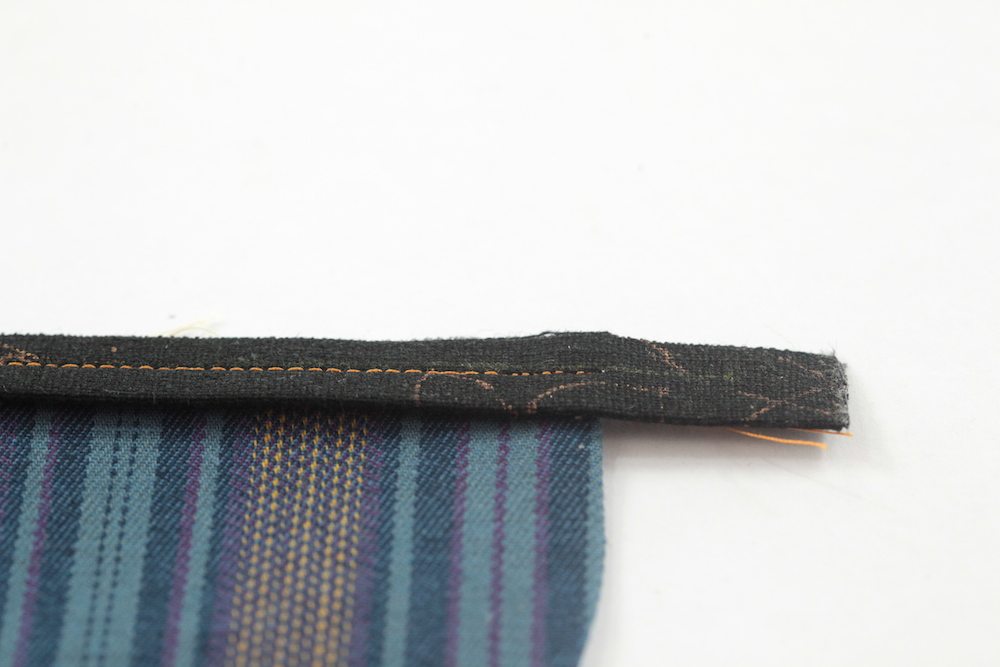
Stitch the sides and bottom of the flap with a 5/16″ (8 mm) seam allowance (from the lining fabric). Why are we doing a 5/16″ (8 mm) seam allowance? It is because of the offset we’ve done above. The seam will roll to the inside just a tiny little bit, and that tiny little bit is split between the outer flap and the lining fabric. By using a 5/16″ (8 mm) seam allowance on the lining, the outer fabric actually gets a 3/16 (5 mm) seam allowance only. This may still be confusing; when in doubt, just add 1/16″ (2 mm) to your normal seam allowance, and that’s the seam allowance you use for this particular step.
Trim and grade the seam allowances, as well as putting several notches on the rounded corners.
Trim and grade seam allowances. Notch the rounded corners.
Turn the flap right side out. I like to pin the opening shut before I press (not on the pins), so I know exactly where the seam is supposed to be. Baste the top opening shut. Note that the seam is slightly rolled to the lining side.

Pin the opening shut before pressing.
Baste the top shut.
Press each welt in half with the wrong sides together.
Press each welt in half.
Pin one welt to the flap (outer flap against the welt); the raw edges of the welt and the flap are aligned. I also use chalk to draw a line dissecting the welt (i.e., in the middle of the welt). This chalk line helps me to sew accurately in the next step.
Pin one welt to flap. Mark the middle of the welt.
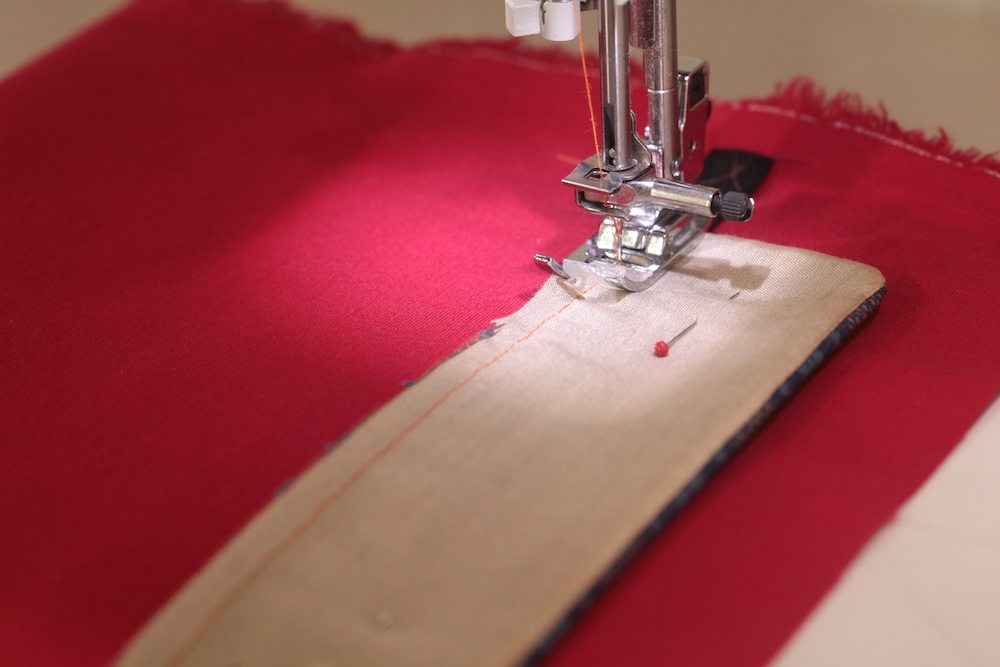
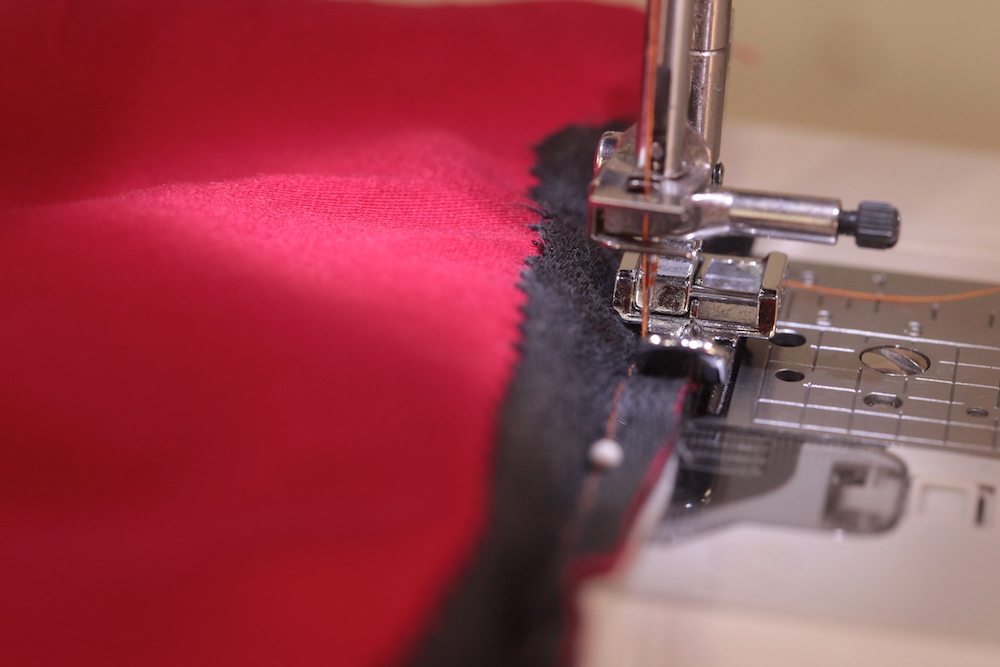
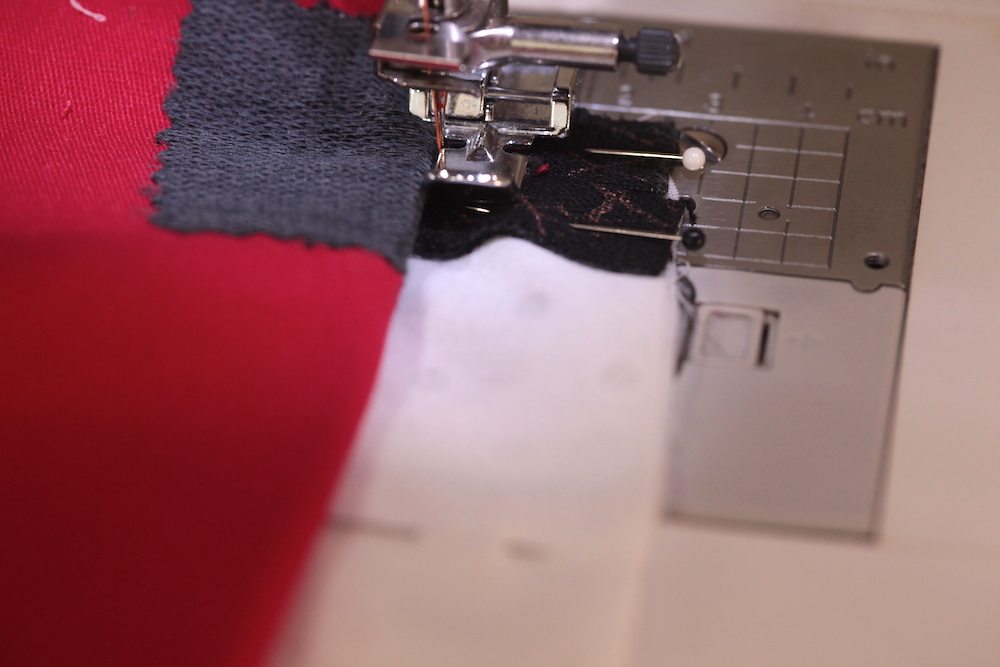
Stitch the welt to the flap, starting ***exactly*** at the beginning of the flap to the end of the flap. I use a short stitch length (1.2 mm) at the beginning and at the end of that line to anchor it, instead of using back stitch. It’s more accurately, and it doesn’t create a little lump.
Using the chalk mark as a guide, stitch from one side of the flap to another side of the flap. Oh btw, you see the little stack of the Post It notes? I stick that onto the sewing machine bed as a guide so I can sew more accurately.
Use a short stitch length (1.2 mm) at the beginning and at the end of the stitch line.
Mark the right side of the jacket where the pocket will be placed. I mark one horizontal line for the opening, as well as two vertical lines to indicate the beginning and the end of the pocket opening. Here I use a heat erasable market, but use whatever you have for an accurate line that can be erased.
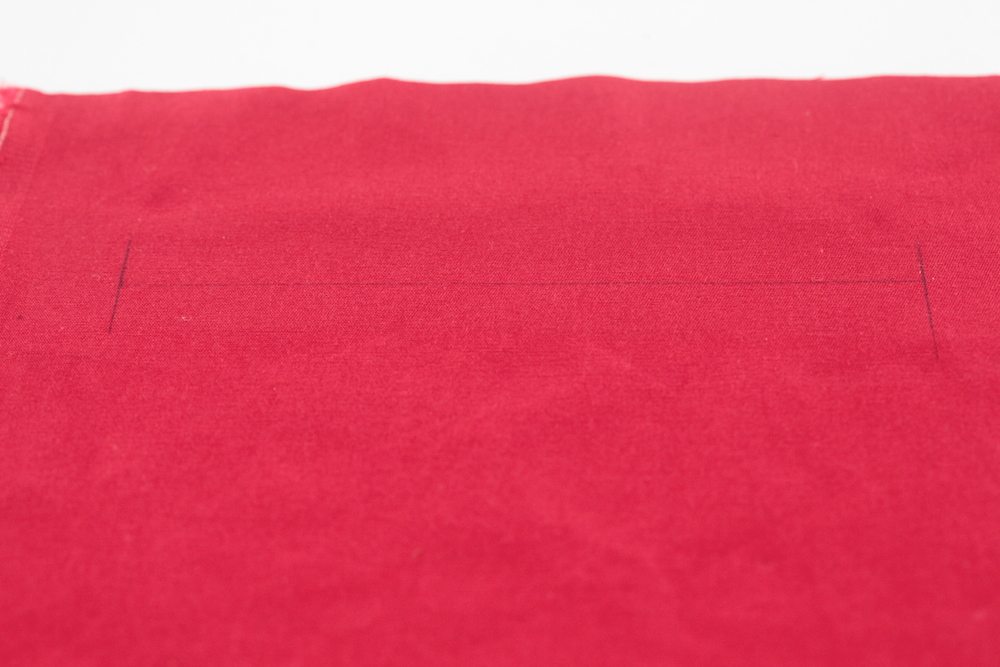
Mark the right side of the jacket where the pocket will be.
With the welt side down, place the flap/welt combo on the right side of the jacket, with the raw edges aligned with the horizontal mark on the jacket. The finished edge of the flap should be pointing up. The sides of the flap should align with the marking. If they are not exactly the same, you need to follow the flap and remark.

Align the welt/flap with the marking on the jacket.
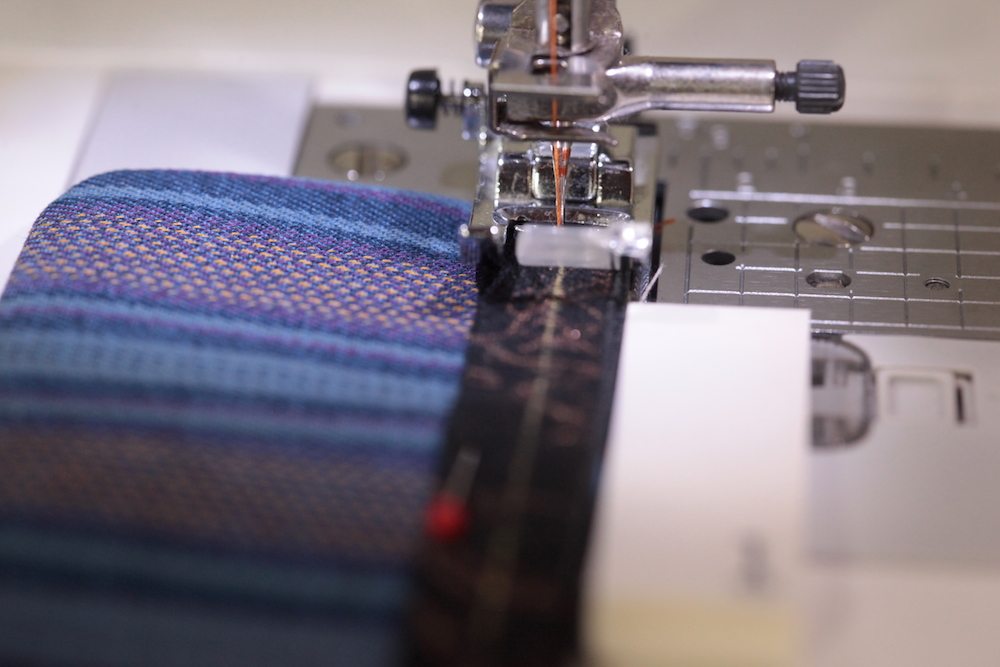
Stitch the flap/welt combo to the jacket, stitching ***exactly*** on the previous line that you made on the flap. You are stitching through the flap lining, flap outer fabric, two layers of welt and the jacket.
Stitch on the line previously made.
Take the other welt and align it on the mark on the jacket. The raw edges of the welt are against the marking, hence against the raw edges of the flap/welt combo. I also use a chalk to mark the middle of that welt.
This is a good time for me to explain why I use a 1/4″ (6 mm) seam allowance. Because my finished welt is 1/4″ (6 mm), with a seam allowance of the same length, I am able to have the raw edges butted on this step. Imagine that the seam allowance is bigger here; the welts will need to overlap each other, which may add some difficulty. However, if you have gone through this process a couple of times and are pretty confident with the process, and you want to have a bigger seam allowance to support the pocket more, you could certainly use a bigger seam allowance.

Align the second welt on the mark, with the fold pointing downward.
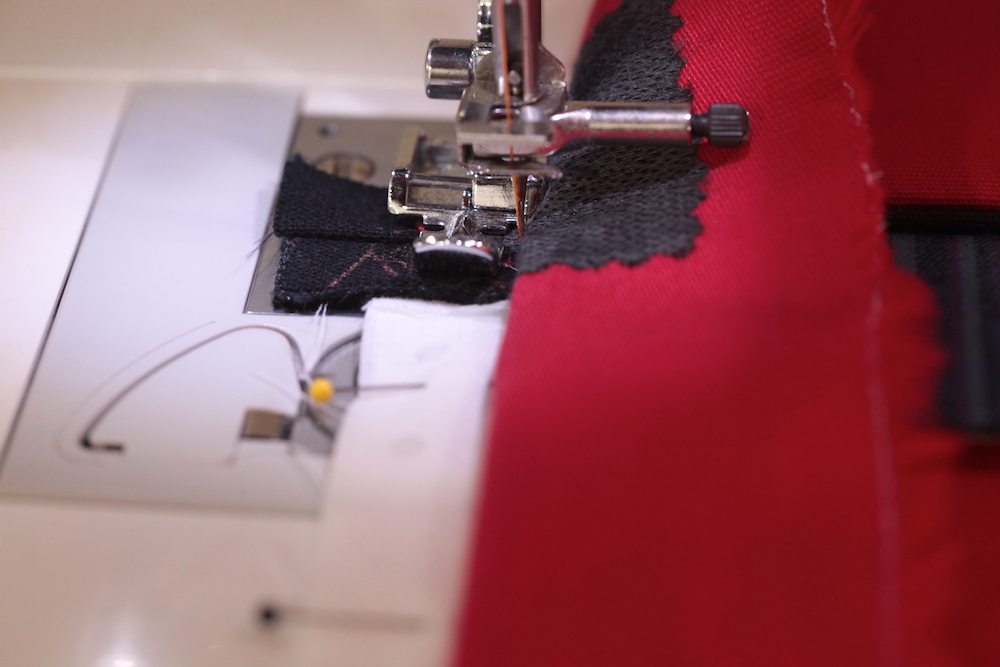
Stitch on the second welt to the jacket. This stitch line is ***exactly*** below and parallel to the stitch line on the flap. As before, I use a small stitch length (1.2 mm) at the beginning and at the end portions of the line, instead of using back stitch, to secure the line. In the photo below, you can see that I use a masking tape as a guide to indicate where my stitch line begins. I have another piece of masking tape to indicate the end of the stitch line too. I use masking tape quite often for marking purpose. This one does not leave any residue when I peel it off.
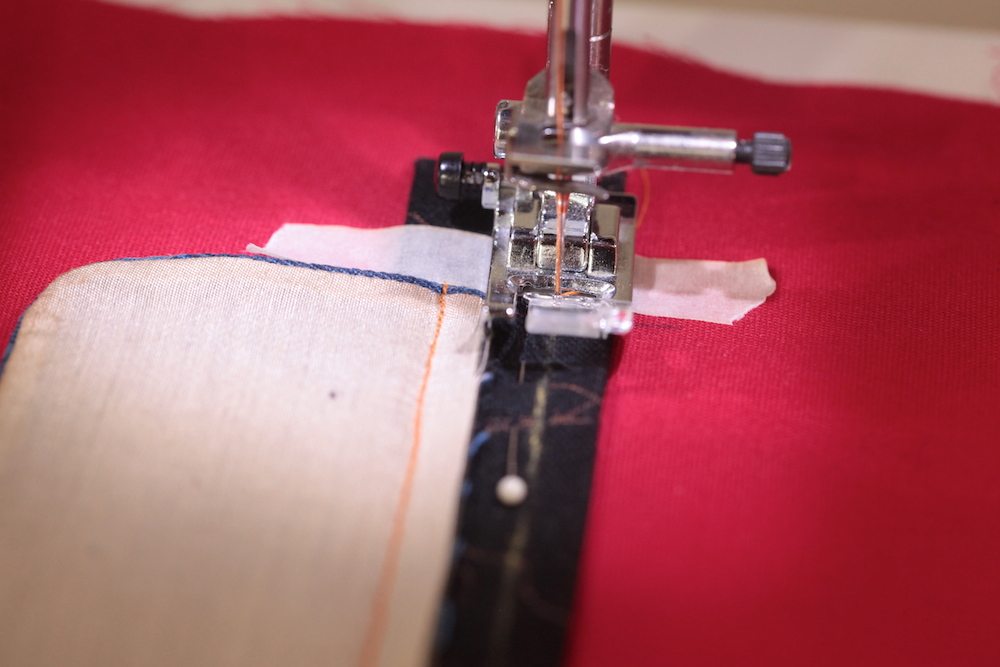
Stitch the second welt – the line is directly below and parallel to the line stitched on the flap.
Flip the jacket so you can see the wrong side.
This is how the wrong side looks like now.
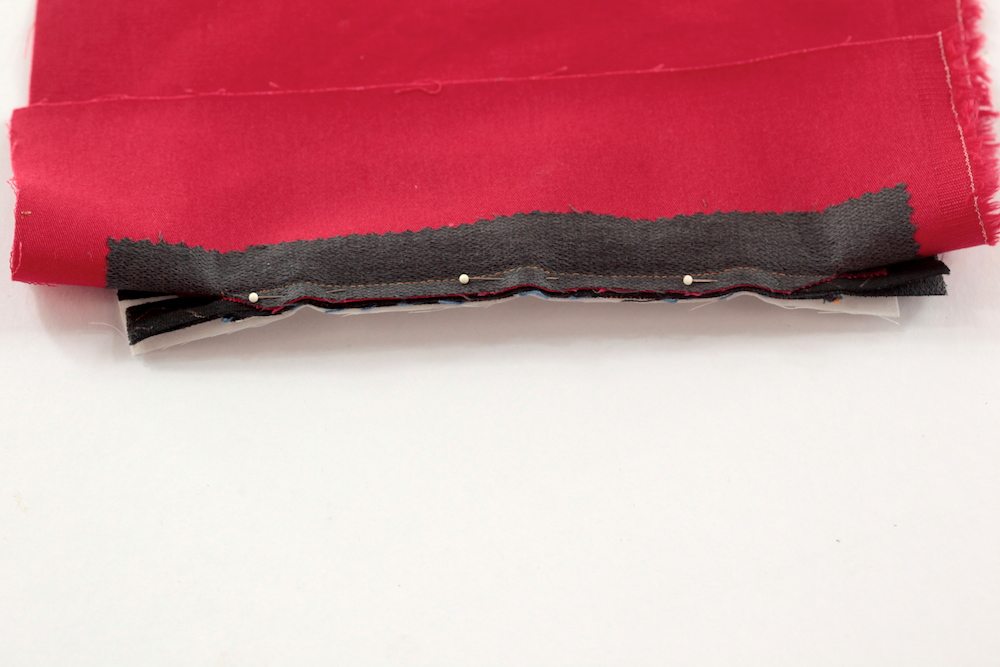
Cut the jacket below the two stitch line to about 1/2″ (1.25 cm) short of each end. Then clip diagonally to the end/beginning of the stitch lines, as in the photo below. You cannot chicken out here. It must be clipped ***exactly*** to the stitch line, or you will have puckers after you turn your welts.
Cut between the lines and clip diagonally to the stitch lines.
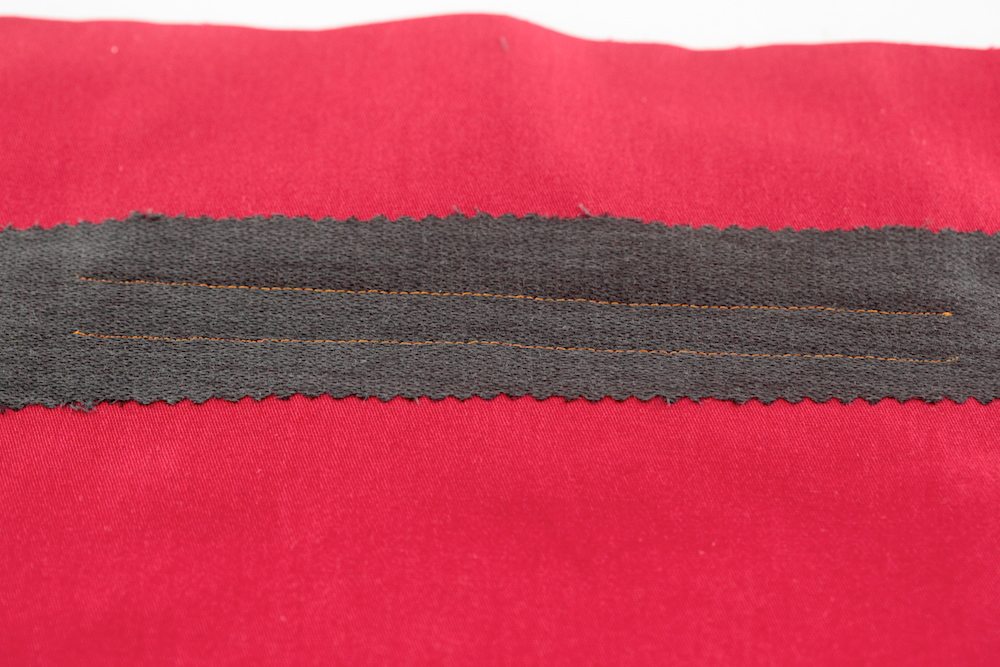
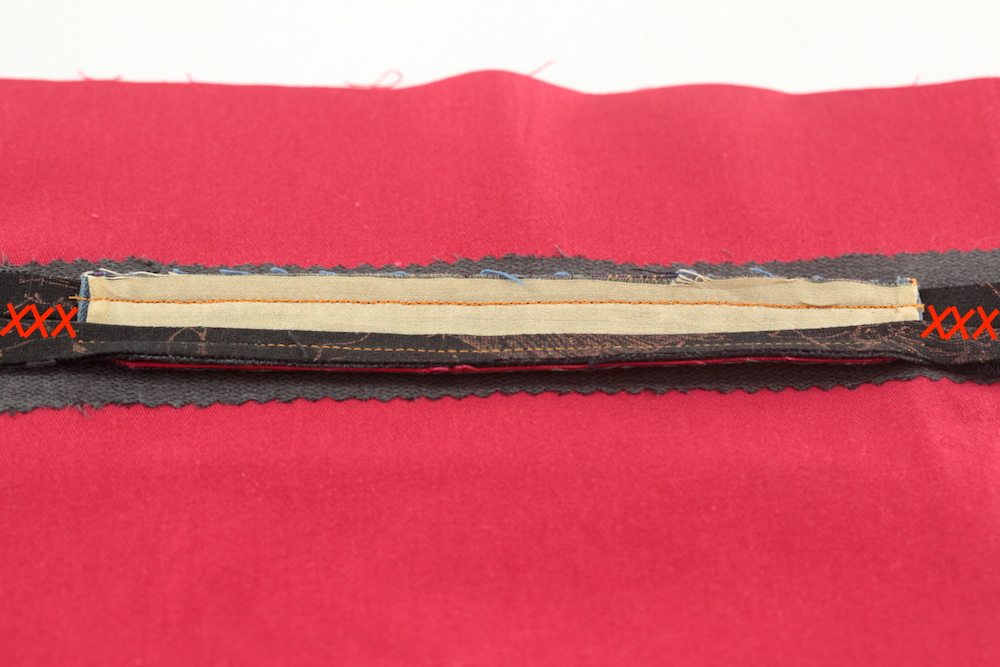
Turn the welts to the wrong side through the opening you just cut. Now the welts peek through the opening and the folded sides of the two welts are pointing to each other. The flap is flipped downward as a result too. Give it a very good press all the way around, right side and wrong side. If the corners are not sharp and have puckers, turn the welts back and be sure to clip to the stitch line in the previous step! If it looks like the photo below, do a happy dance.

This is how the wrong side looks.
It is also a good idea to hand baste the welts together on both sides.
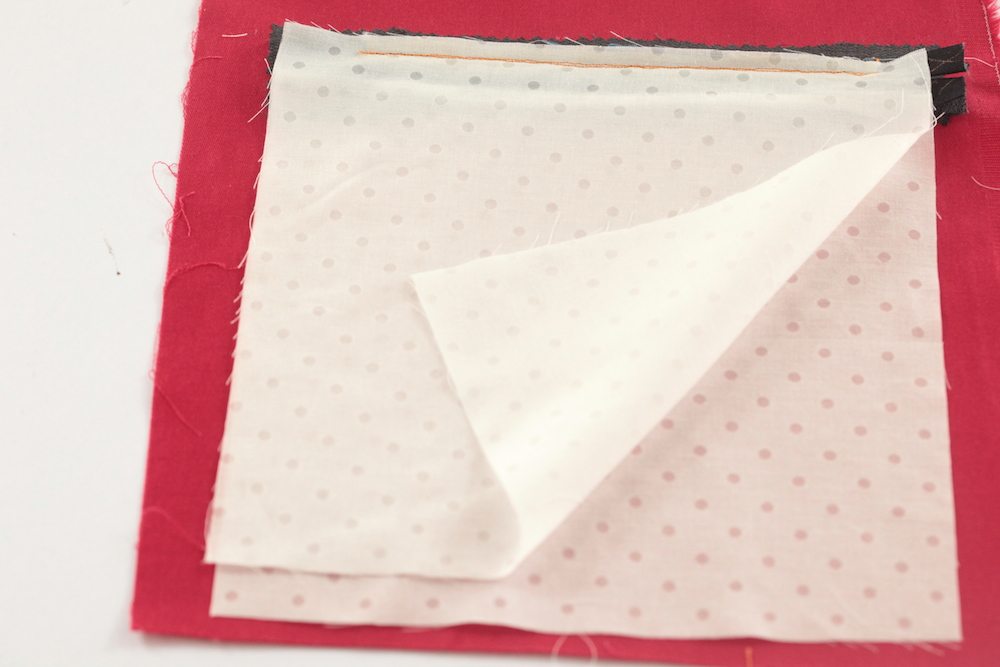
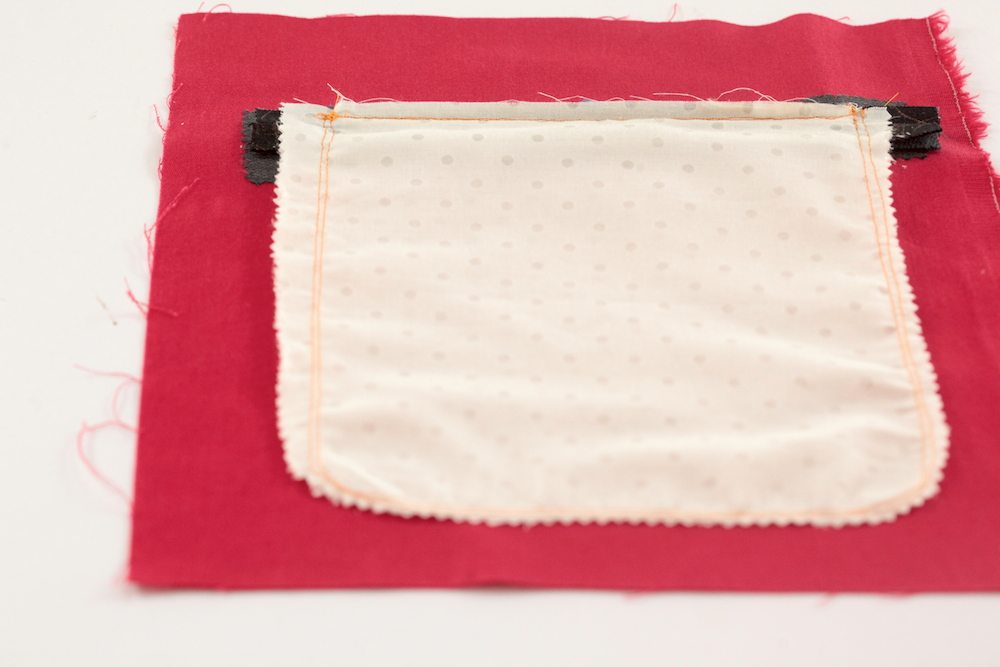
You are only missing the pocket bag. Flip the jacket so the wrong side is facing you. Place one pocket bag with its raw edge aligned with the raw edge of the top welt.
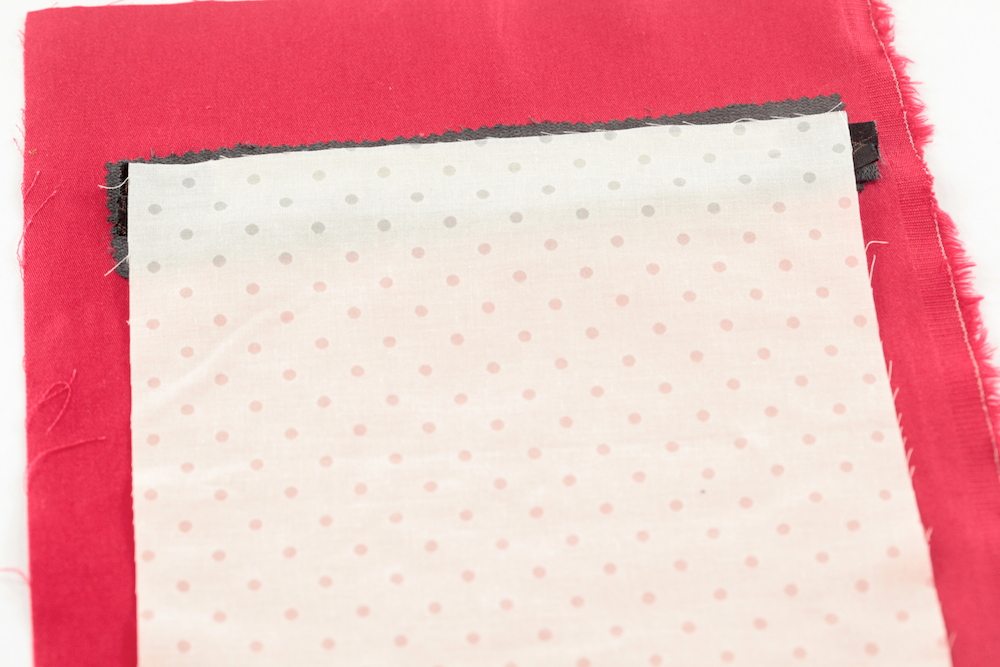
Raw edge of the pocket bag is aligned with the raw edge of the top welt.
Another view.
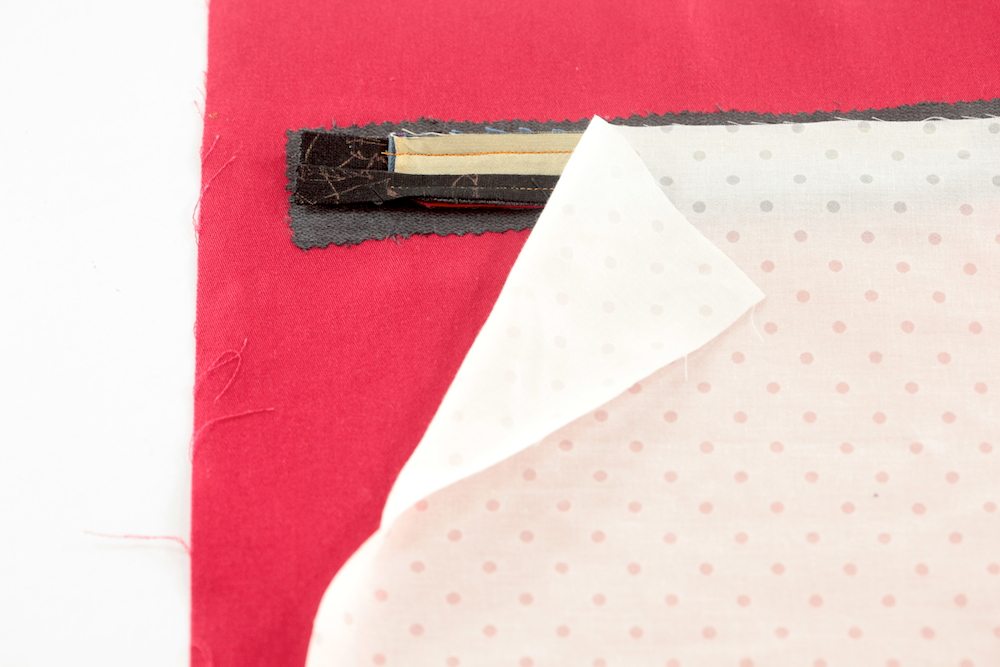
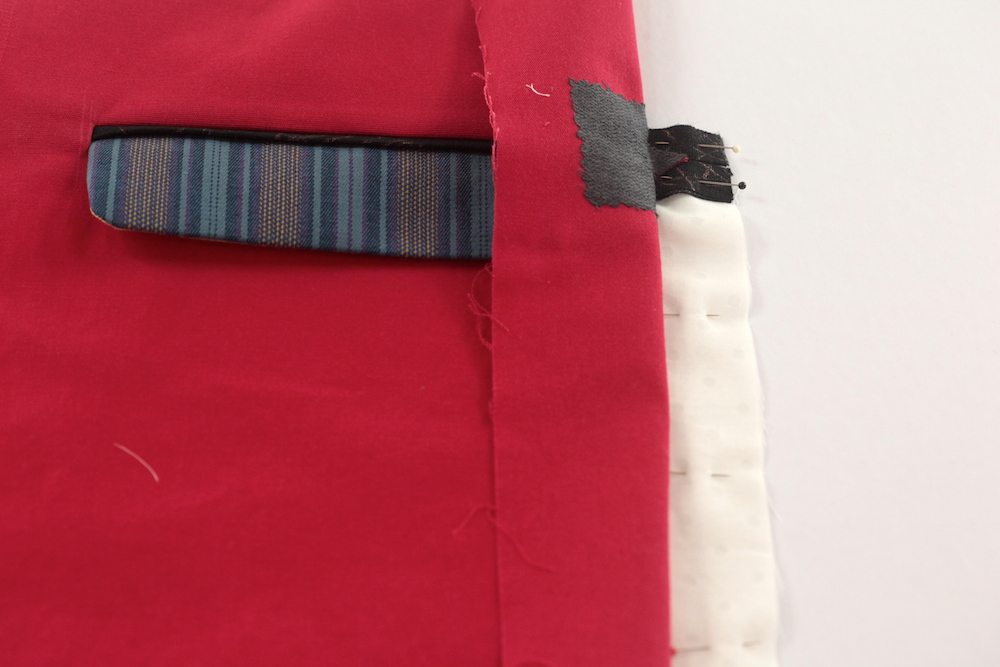
Pin the top welt and the pocket bag together from the welt side. We are going to stitch from the welt side, that’s why we are pinning from that side.

The top of the jacket is folded out of the way. You can see the pin mark, but they are pinned from the welt side.
Flip it over and this is what you see.
Stitch the pocket bag to the jacket and the welt by stitching on the line previously make. You are stitching on the jacket, both layers of the flap, both layers of the top welt and the pocket bag.
On the previous stitch line, stitch through the jacket, both layers of the flap, both layers of the top welt and the pocket bag.
After stitching, flip it up so it gets out of the way.
Flip it up to get it out of the way.
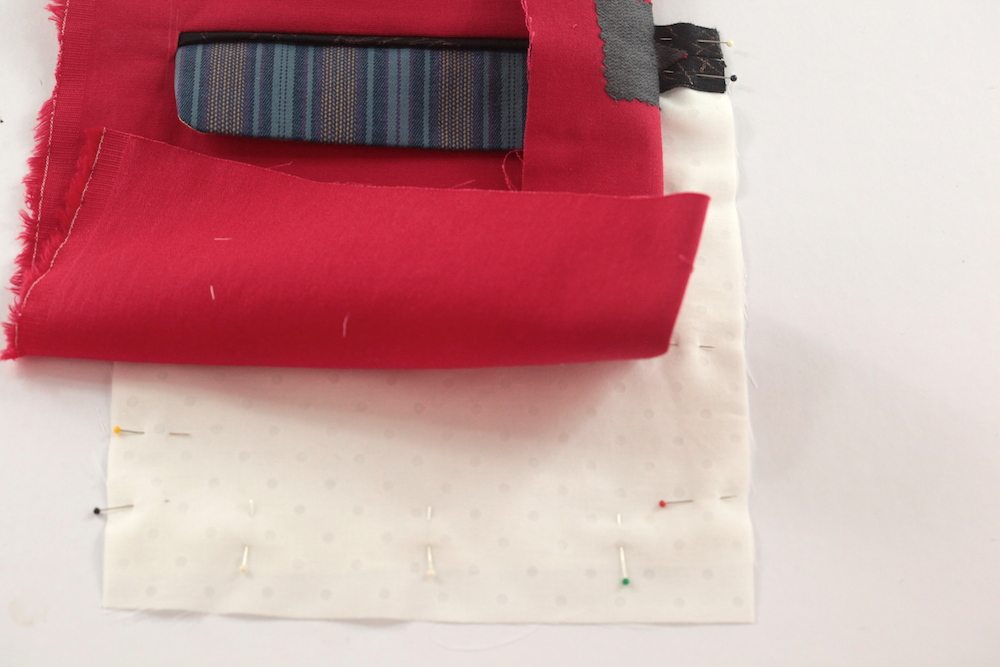
Place the second pocket bag against the bottom welt. The raw edge of the pocket bag is aligned with the raw edges of the bottom welt. Pin them together, but from the welt side because we’ll be stitching from that side.
Pin the second pocket bag onto the bottom welt, with raw edges aligned. Pin from the welt side.
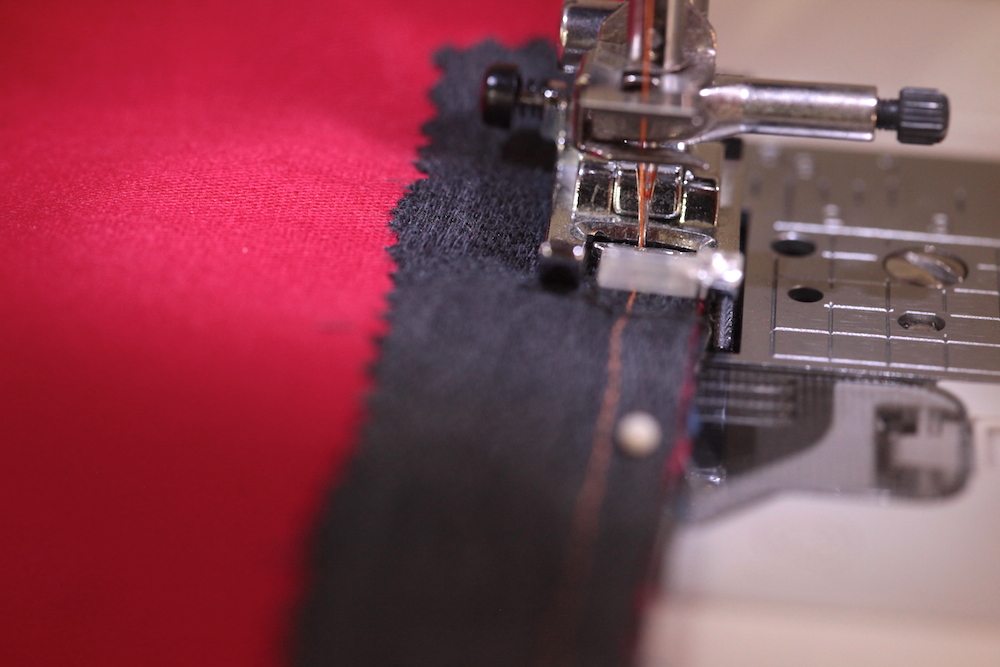
Using the previous stitch line as a guide, stitch the pocket bag, two layers of welt and jacket together. You will need to use a regular zipper foot for this, because there’s some bulk to avoid on one side.
Use a regular zipper foot so you can stitch on the line previously made.
Press both layers of pocket bag down. You will notice that one layer of the pocket bag ends higher than the other. You could take it into account when drafting the pocket bag initially, but I think it’s not a worthwhile endeavor since you can trim the bag after stitching. Sometimes everything should line up, and there are other times that excessive precision is unnecessary.
The two layers of pocket bag look like this.
Now it’s the time to determine how deep you want your pocket to be. I encourage you to put the jacket piece on you and try reaching into the pocket. There’s nothing more annoying than putting something in your pocket and not be able to reach it at the bottom. So try it on and make a mark where you want it to end.
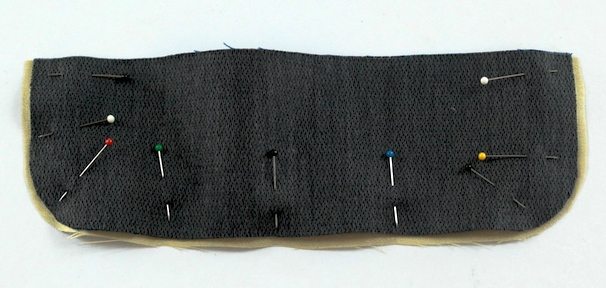
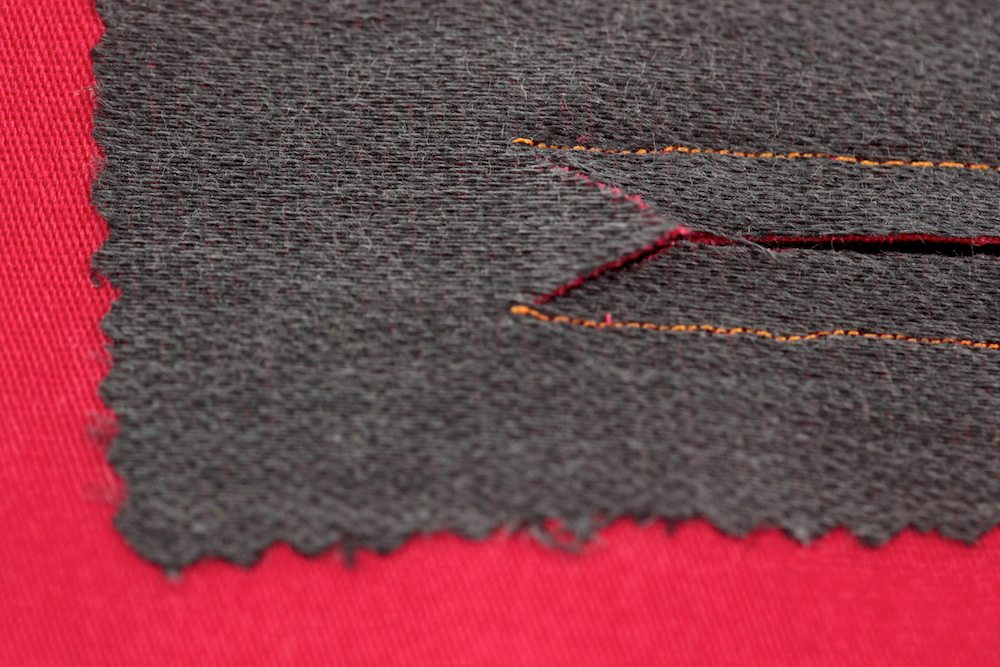
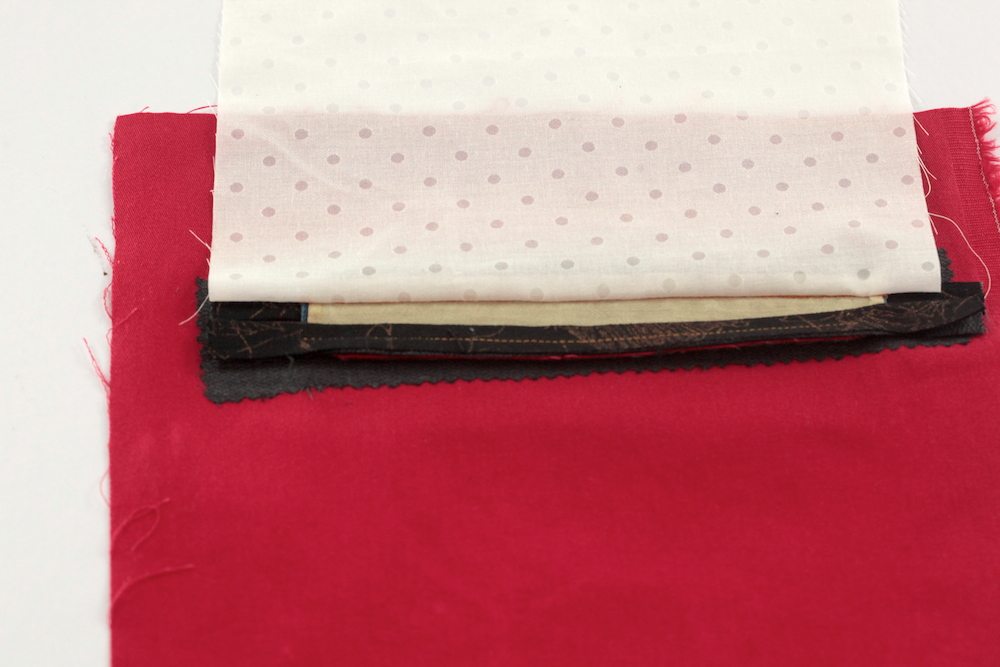
Flip the jacket to its right side. Peel the side out of the way so that you can see the welts and the pocket bag. Note that little triangle? You need it out like in the photo below. Pin the pocket bag layers together. One important thing is that the folds of the two welts need to be butted together (for both sides of the pocket); don’t let them drift apart. You can even baste them together by hand.
With the right side up, get the side of the jacket out of the way so that the welts and the pocket bag is exposed.
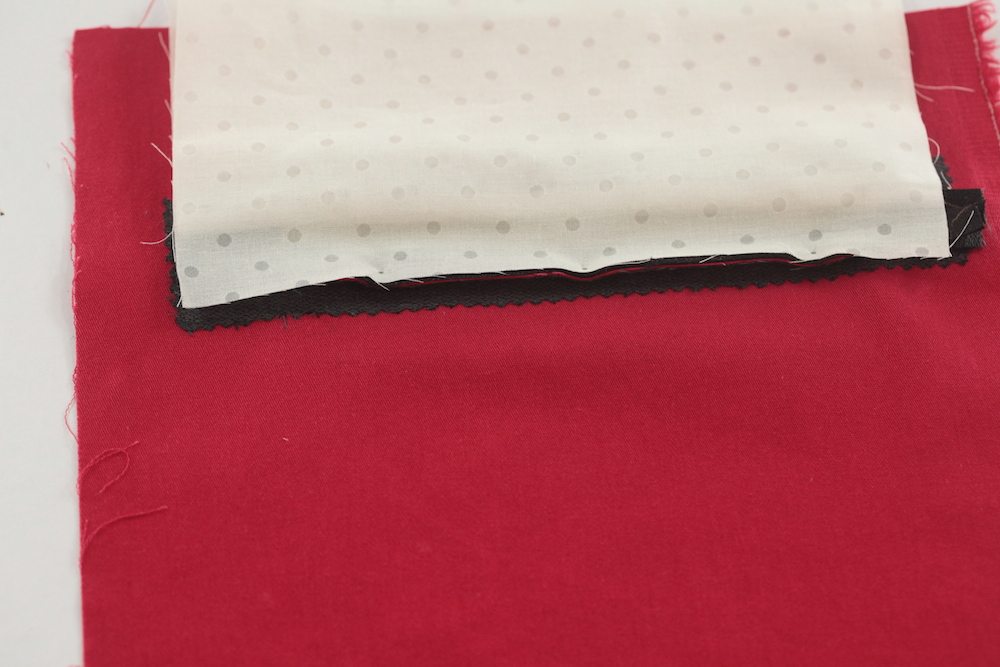
Pin, pin, pin all the way around the pocket.
Pin, pin, pin all the way around the pocket. See the triangle on this side? You want it out too like in the photo.
You can mark the pocket if that makes you feel more comfortable. Start stitching from the top, catching the little triangle shown above – you will need to stitch on the left-most base of that triangle. I like the bottom corners of my pocket bag rounded, so they don’t accumulate dust and lint as much. Use your regular zipper foot for this step.
Remember to catch the triangle.
Rounded bottom corner. Be sure that you are catching both layers of the pocket bag!
I stop stitching at the bottom of the pocket. I find it easier if I start stitching from the top. Remember to catch the triangle on this side too – be sure that stitch line is straight and stitch at the right-most base of the triangle.
Start stitching from the top on the other side too. Remember to catch the triangle.
Stitch until you meet up with the other stitch line to create the pocket. Stitch another line just 1/8″ (3 mm) away from the first line (outer) to make the pocket more sturdy. I trim the pocket back using my pinking shears.
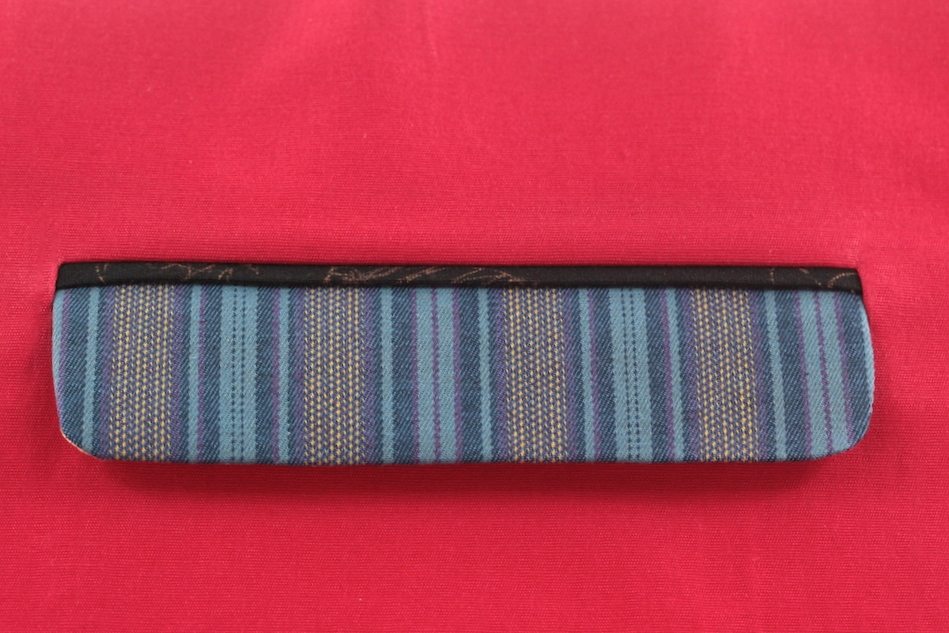
There you have it! It’s done!
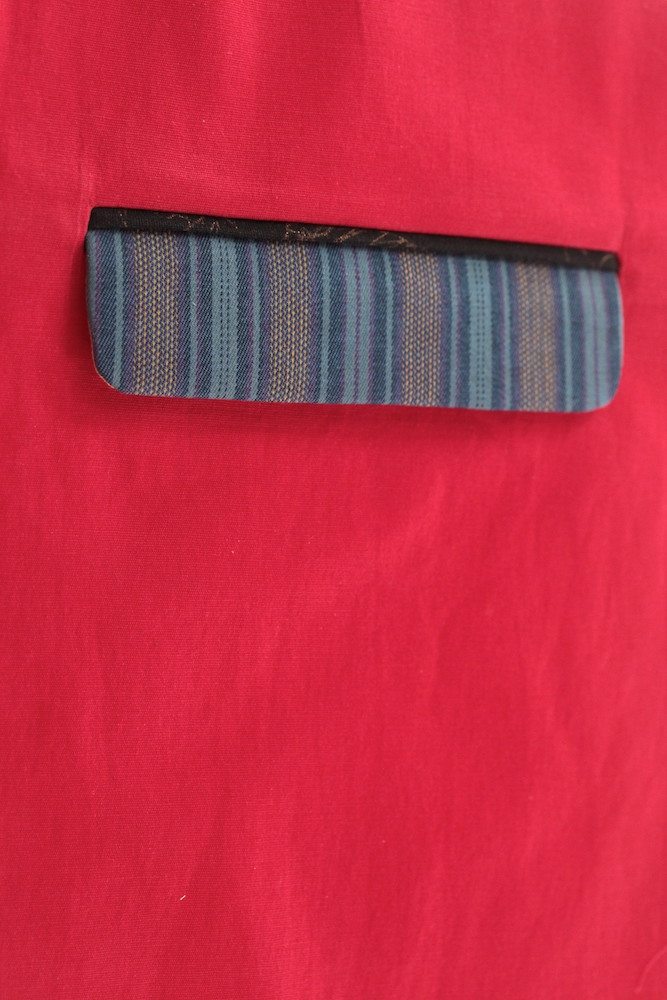
Is it beautiful or what?
I hope this is helpful. Practice and it will be worth your time and effort. You will be very proud of your double-welt pocket with flap.

Thank you for this great tutorial! I just made two matching pockets on my blazer and I’m so happy with them ☺️
Exactly what I was looking for, thank you so much!!🤗
Amazing Tutorial! Just completed my pocket! So helpful Thank you 🙂
Thank you so much for this tutorial!
perfectly clear explanation – it was easy to follow along and the result was great!!
this is so helpful. very easy to follow. I never made a welt pocket before. I was to make one for a client a and I just searched the internet and found this wonderful tutorial and I got it once easily. thanks so much
Thank you Kennis for a great tutorial!! Getting ready to make a sample. Fingers crossed!!
I will post a picture to your fb.
Good luck!
Excellent tutorial! Thank you. So easy to understand and see each step.
That is a fabulous tutorial! Thank you!!