")
How to Grade a Pattern Up or Down a Size (or Two)
Have you fallen in love with a pattern, only to find that it doesn’t come in your size? A few ladies told me that Itch to Stitch’s patterns don’t come in their sizes – some are smaller and some are larger than the measurements. Perhaps you have a tween who is not quite big enough to wear adult sizes, but too big for kid’s patterns. Perhaps you have a paper sewing pattern whose size range is just outside of yours (paper patterns come with one size range in an envelop, e.g., 6-8-10-12-14 in one envelop and 14-16-18-20-22 in another).
There’s no need to despair. With a little time and some effort, you could grade the pattern up or down.
This method is a pretty safe bet to change up to two sizes.
The caveat is that the pattern must be evenly graded.
Evenly Graded?
What does “evenly graded” mean? It means at any specific point (let’s say, the waist), the measurements between sizes are the same.
Here’s an example (hypothetical numbers):
| Size 00 | Size 0 | Size 2 | Size 4 | Size 6 | |
|---|---|---|---|---|---|
| Waist | 64 cm | 66 cm | 68 cm | 70 cm | 72 cm |
You see that each waist measurement is 2 cm larger than the previous size.
However, it doesn’t mean that every point on the pattern must increase by the same amount. In fact, it’s likely that it doesn’t grow by that same absolute amount. Think about when a person gains or loses weight, some part of her body would increase/decrease more than others. And no matter how much weight she gains or loses, she wouldn’t be taller or shorter.
Here’s the example:
| Size 00 | Size 0 | Size 2 | Size 4 | Size 6 | |
|---|---|---|---|---|---|
| Waist | 64 cm | 66 cm | 68 cm | 70 cm | 72 cm |
| Neck to Waist Length | 35 cm | 35.25 cm | 35.5 cm | 35.75 cm | 36 cm |
In the example, while the waist still grows 2 cm per size, the neck to waist length only grows by 0.25 cm per size.
This is typical of women’s patterns. The “big guys,” such as Burda, Vogue, McCall, Butterick and Simplicity, all have evenly graded patterns. The indie pattern companies, such as Jalie and Silhouette also evenly grade their patterns, although some patterns have huge size ranges, so they may evenly grade only within a sub-range. For example, misses 8 to 16 are evenly graded, and women’s 18 to 24 are evenly graded. As long as there are three or more sizes graded evenly in a pattern, you can still deploy this method.
You don’t have to study very hard to discover whether a pattern is evenly graded. You can pretty much recognize it at the first glance. (This is the Vienna Tank.)
Evenly graded.
Some of Itch to Stitch’s patterns are not completely evenly graded across all the sizes. For example, in Lisbon Cardigan, the larger sizes have increasingly longer bodice, whereas the smaller sizes have the same bodice length. However, because there are more than 3 sizes in one range, you could still use this method to grade up or down.
So maybe this is an unnecessarily long-winded explanation. Most of the time, you can use this method anyway.
Let’s get started.
How to Grade
(Click to see larger images.)
Step 1: Determine how many sizes you need to go up or down.
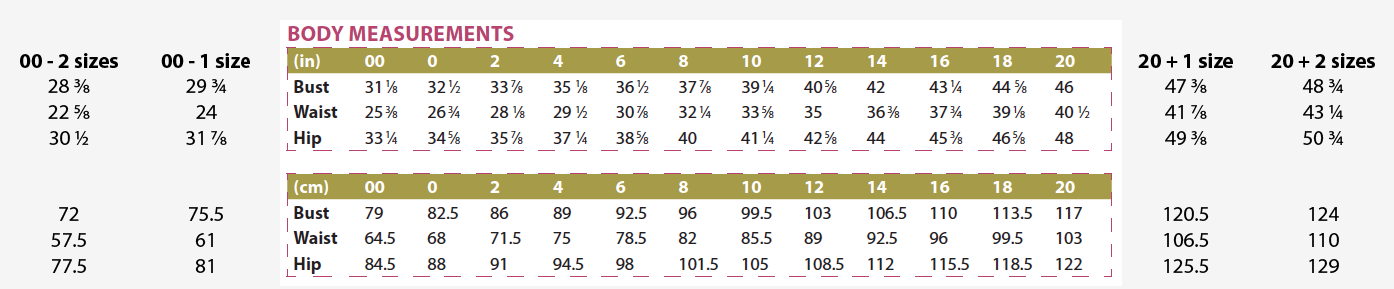
This is body measurement table for most of Itch to Stitch’s patterns.

Notice that for each size, the bust is increased by 1 3/8″ (3.5 cm), the waist by 1 3/8″ (3.5 cm) and the hip by 1 3/8″ (3.5 cm). These figures happen to be the same, but they don’t necessary have to for other patterns.
So if there are two sizes bigger and two sizes smaller, the measurements would look like these:
Are you grading one size smaller/larger? Or two sizes?
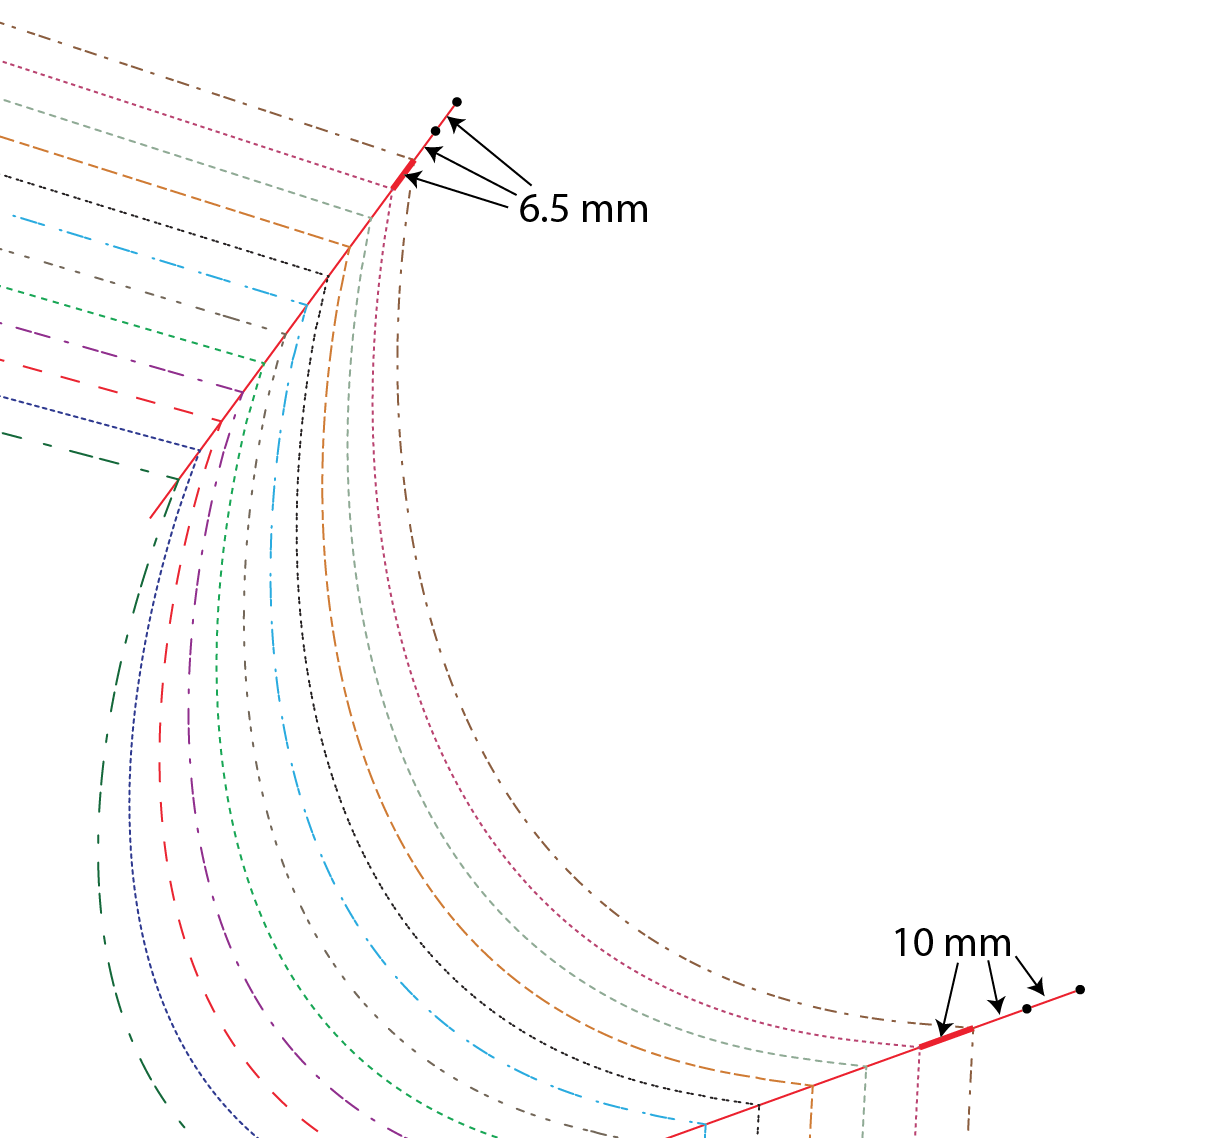
Step 2: On the pattern, draw a straight, guiding line to connect the “corner points”.
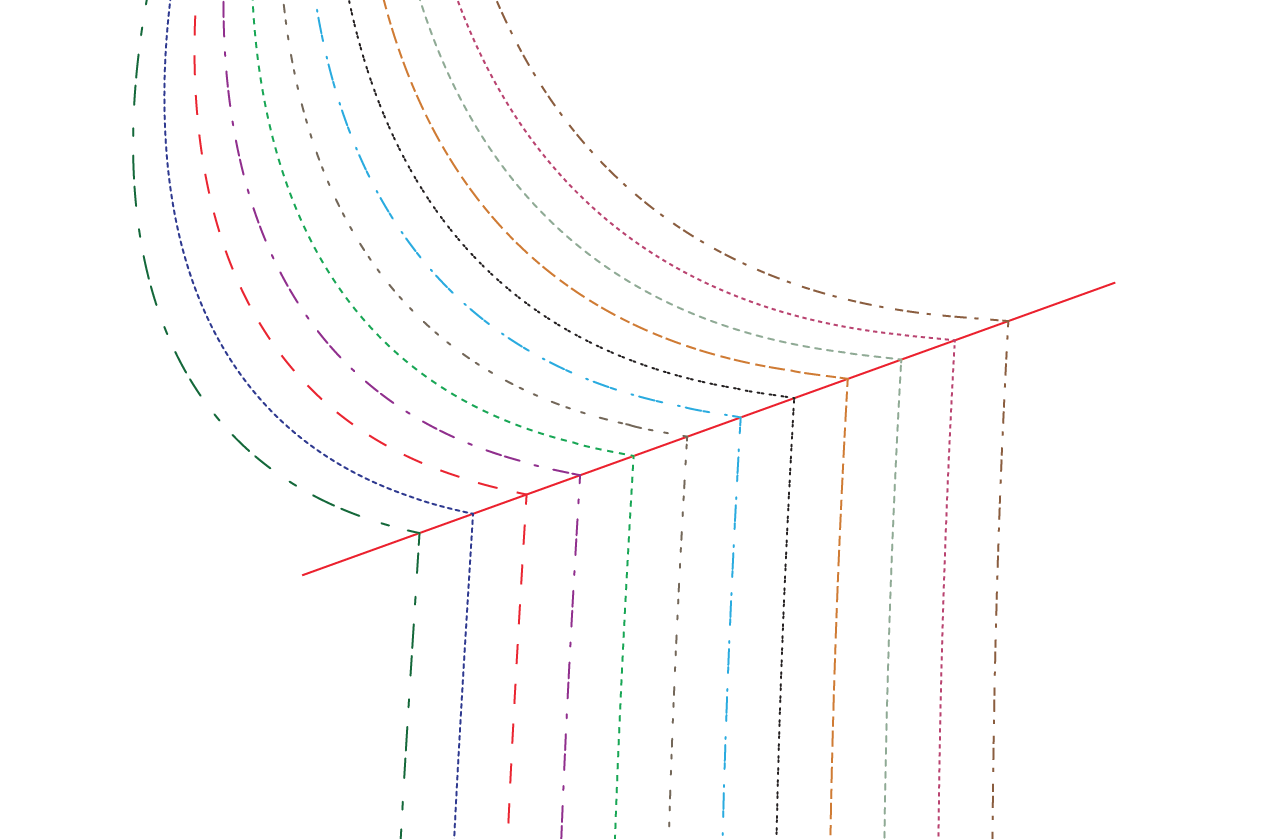

Step 3: Measure the amount between sizes along each line. If you don’t have too strong of an aversion to the metric system, I think it’s easier to use millimeter (smaller unit is easier). But either way would work. I am going to use millimeter here.
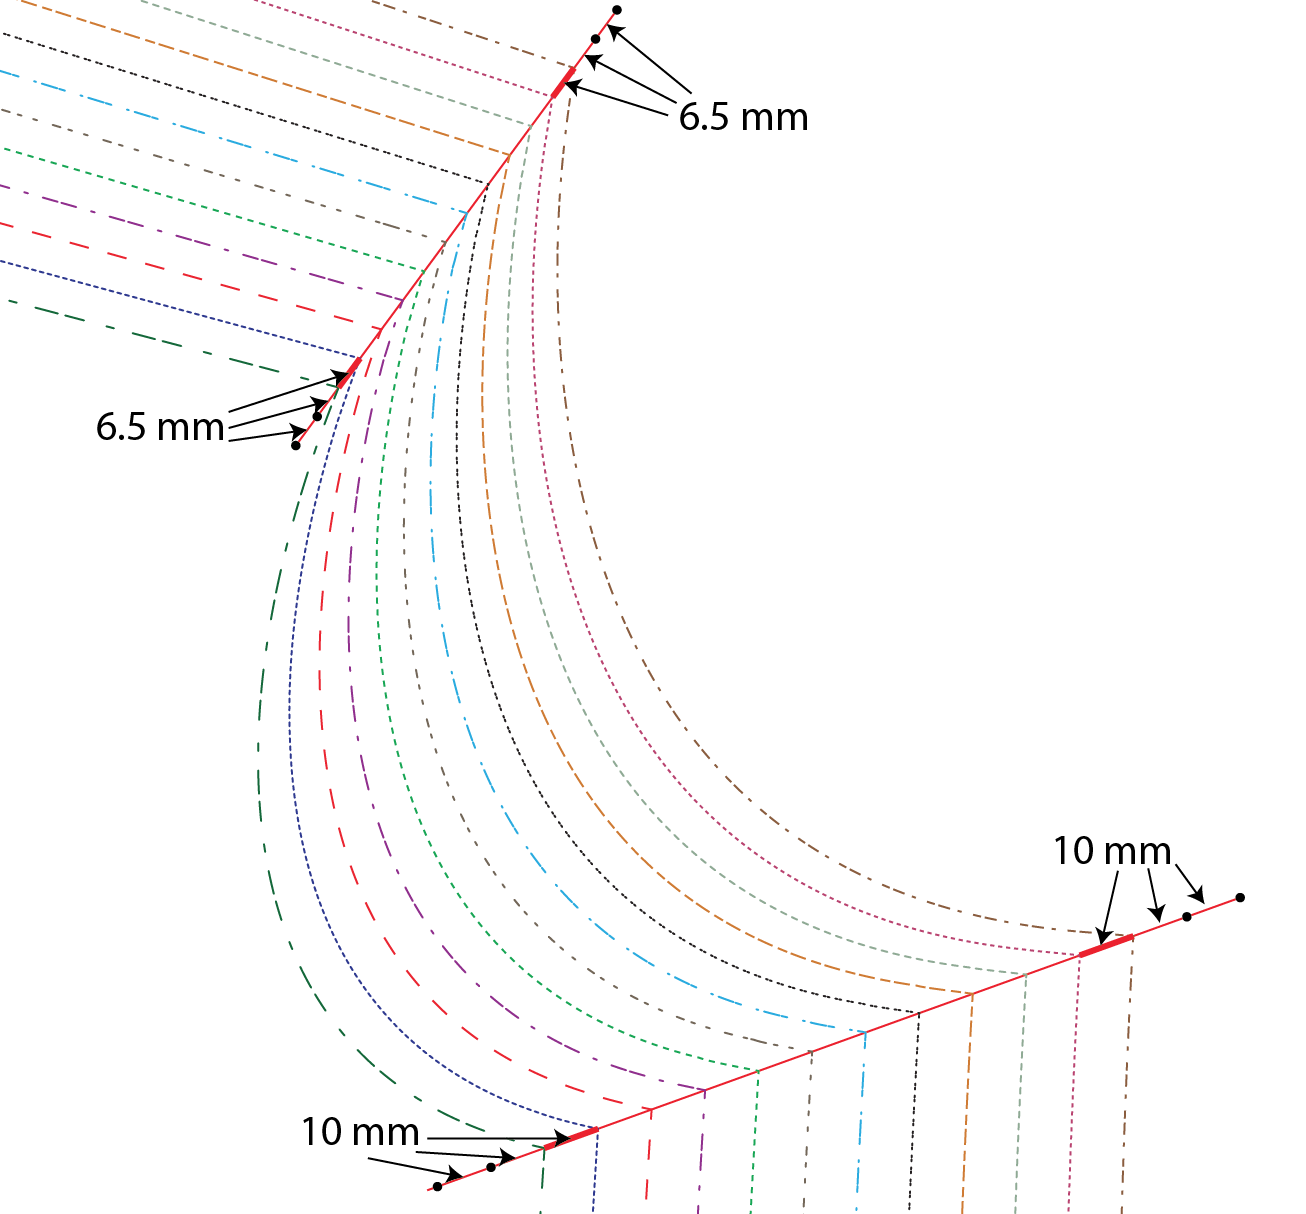
Step 4: Plot the next size (or next two sizes) using the measurements.
The same logic applies with grading down.
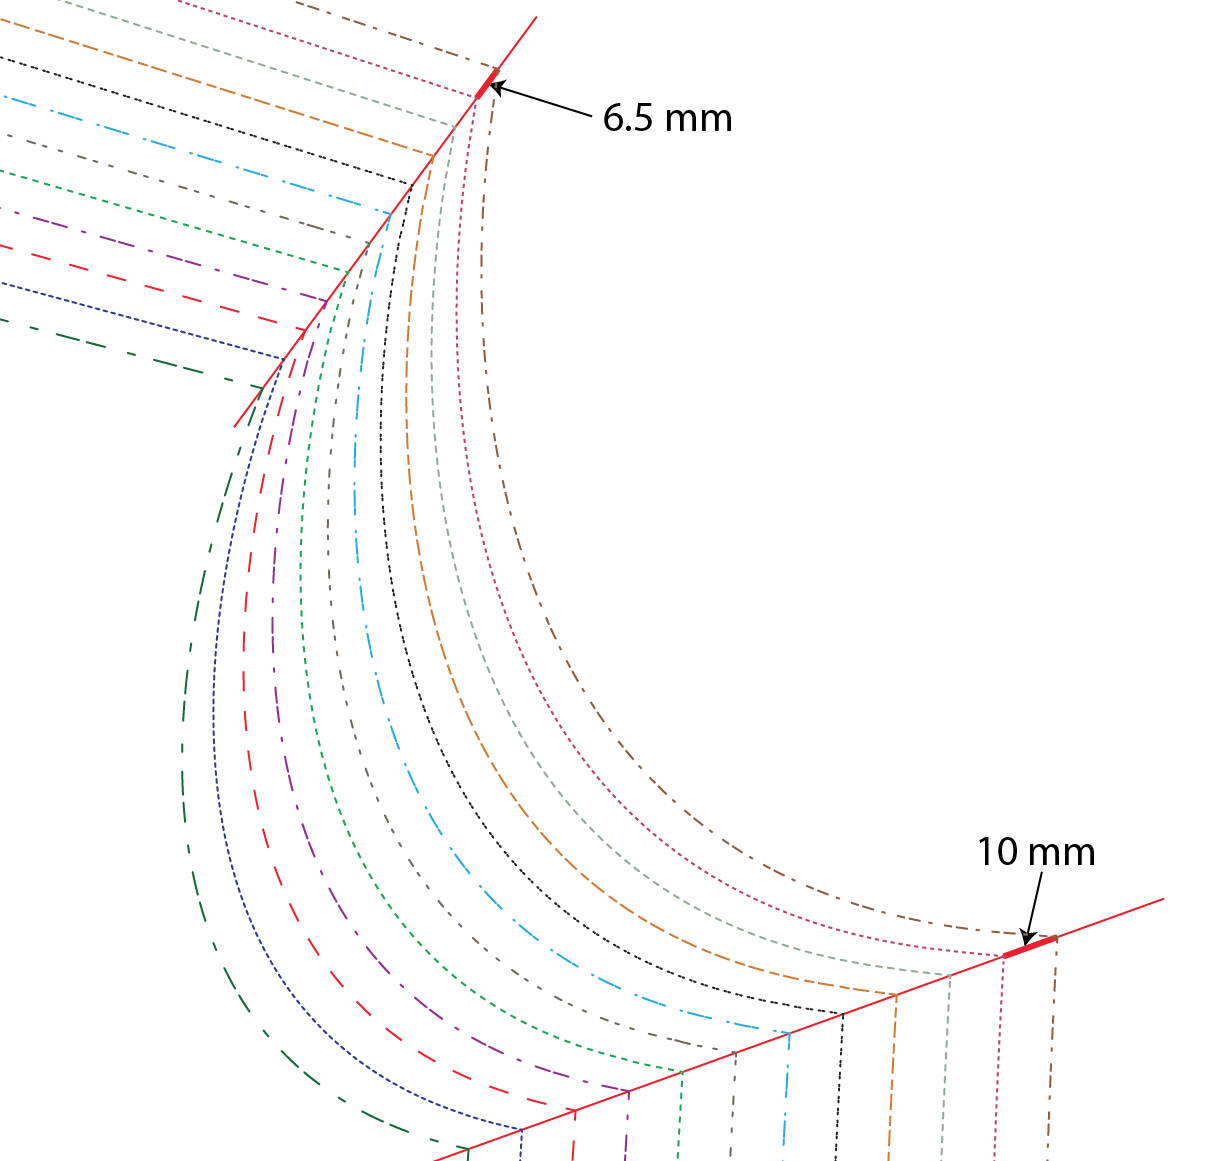
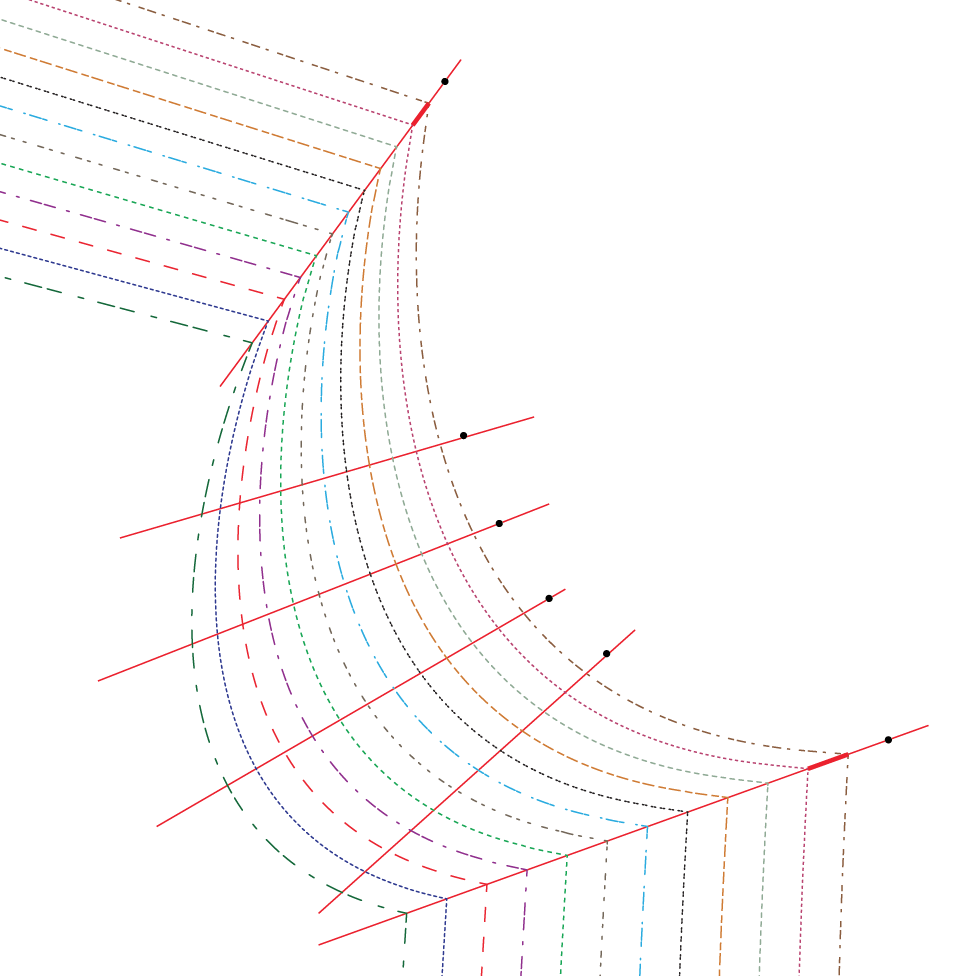
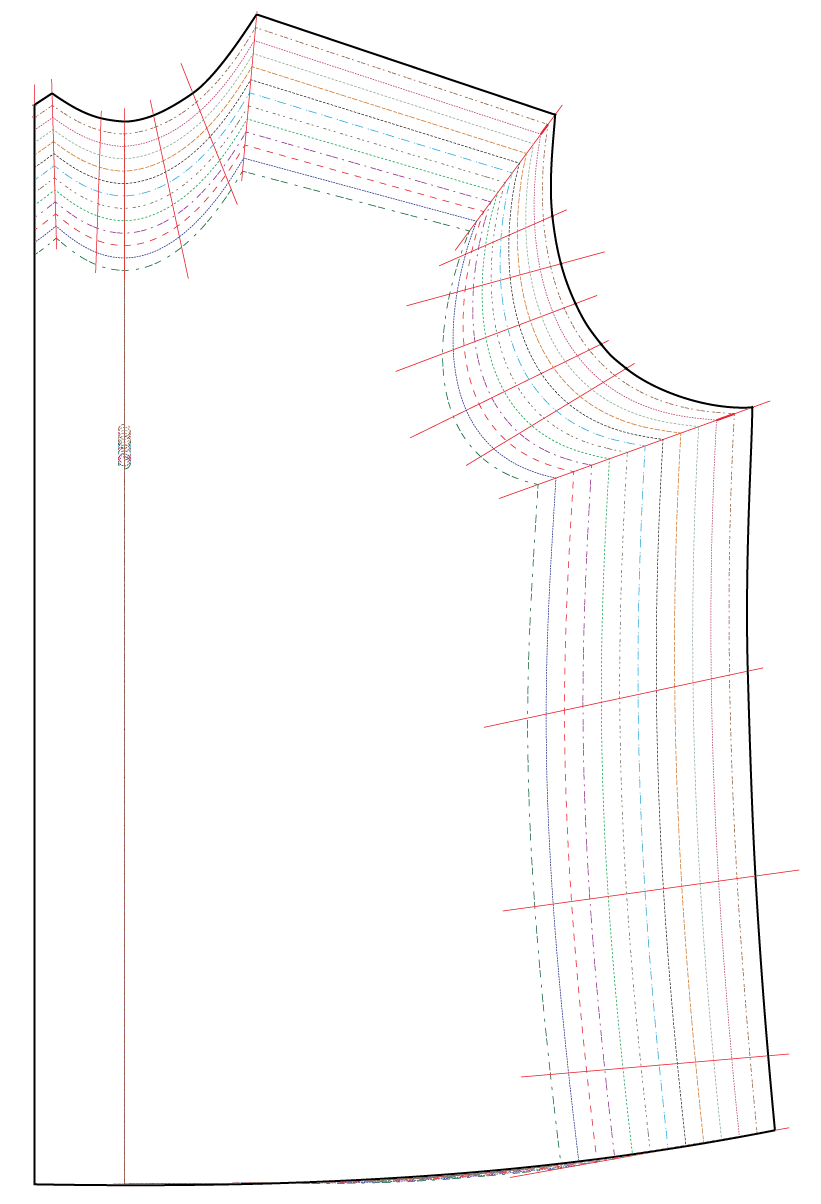
Step 5: Repeat step 2, 3 and 4 along curves. More plots along the curves make it easier for you to connect them smoothly and accurately. There is no absolute number of lines that you need to follow. You can do it sparingly but enough to make you comfortable with drawing the curve. Try to have the straight guiding lines perpendicular (the right word is probably “tangent”) to the pattern lines but you don’t have to be insanely precise (we are increasing/decreasing one or two sizes). You don’t need to draw more straight guiding lines along the straight part of the pattern lines; those are easy to connect.
In the following example, I am going to continue on increasing one size only, but you get the drill of increasing two sizes or decreasing a size or two.
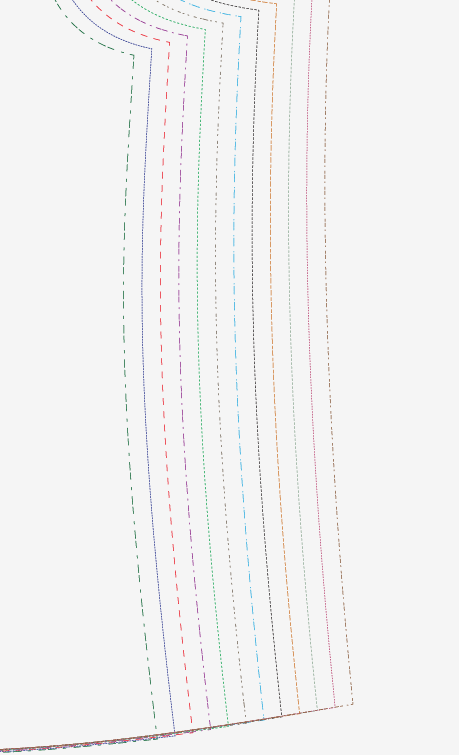
Step 6: Connect the dots as smoothly as you can.
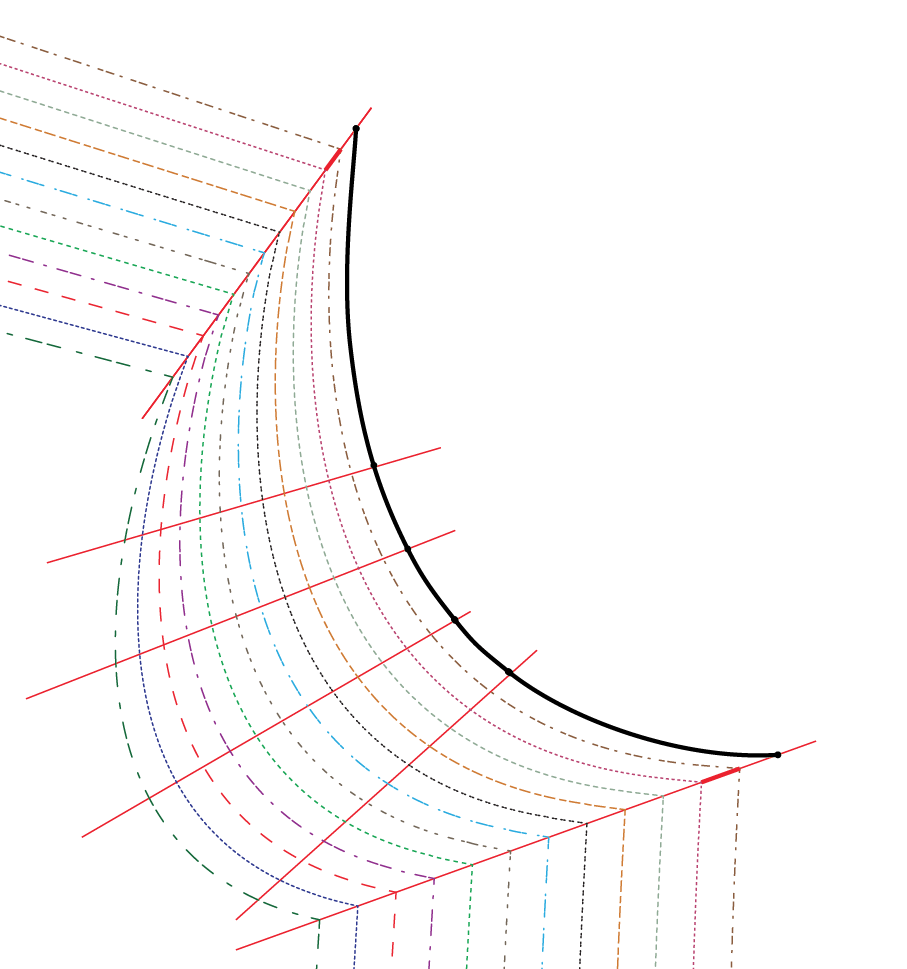
After you draw all the dots and connect all of them, it will look like this:
Repeat for each pattern piece and there you go!
I hope this is helpful. Keep stitching!

Thank you so for this. My granddaughter is just entering the tween sizes, and I didn’t know what to do!
Thank you for this tutorial, I really appreciate the fact that it is in metric. So many tutorials are in inches and I am used to cm and mm, so the imperial method with its fractions of inches goes right over my head. So, thank you!!!
This is a Godsend, upgrading or downgrading an existing pattern. Is there a way fmto get c these instructions printed for reference when I do this? I’m a need to see it while I’m doing it person, and it would be so nice if we could get the steps, instructions and diagram in printed form! I’d buy it to keep handy!
EXCELLENT tutorial!!
I am looking size up a mccalls princess seam coat (2 sizes). I also need to do a full bust adjustment. I am guessing I would size up first THEN do the full bust adjustment correct?
So glad i found this! I’m making a shirt for my dad for Father’s day and as a test run I’m trying the pattern to make a shirt in my size, except I just realized I bought simplicity 9157 AA instead of 9157 BB, so neither of our measurements are in this pattern! Luckily, I’m only a 44 by this metric, so grading up one size should do the trick while I wait for BB to arrive in the mail.
Great tutorial! Just stumbled across this. Just what I needed to know. Thanks much.
Thank you, this is very clear. To what extent can I use this for children’s patterns please?
I am not an expert in making children’s patterns, so the short answer is “I don’t know”. But I think you need to factor in the height and width that the child is gaining. You may have to grade more height than the width and vice versa.
i like the tutorial for upgrading a pattern. I’ve got a Simplicity pattern 8444 that goes to a 22 and i’m going to a 28 so this is very helpful. any further advice you have I’ll appreciate it very much!
Hi! I’m a beginner sewist and wonder if it is important to grade a pattern first before shortening it (I am also petite) or vice versa? Thanks for your input and website!
Hi! The end results should be similar, but personally, I think it’s easier to grade before shortening.
This is a fantastic tutorial, thank you. Can I just ask, if you have a pattern that you want to grade that is a single size, how you decide on the angle at which to tansfer pattern markings such as dots and notches? Thank you.
You use the same distance and angle of the last two notches and markings 😊
But what if theres is only 1 size on the pattern – there is nothing to establish a reference point other than the single marking, which doesn’t give you a very accurate direction?
Then you cannot use this method. I suggest you google “cut and spread pattern grading”; this method should suit your need.
Many thanks for this great tutorial. This is so helpful. After years of searching for a jacket pattern, I finally found one, that only goes from 6-10, but I need a 12. Finally I know how to upgrade the pattern to a larger size. Btw, I love your website. 🙂
Hello, i would like to know how would you grade NON adjustable spaghetti straps?
thank you! love the article!
Actually I wouldn’t grade non-adjustable spaghetti straps. I would just lengthen or shorten as you need. Make it longer first, and then put on the garment and change the strap length as you need.
They can be shortened or lengthened. You could also put elastic with inside the strap at the back end or just attach it to the end of the strap on back. That will make them in but forgiving on the length.
Another idea is to make them adjustable yourself.
Another way is to move the a bit closer to the center back, that will slightly shorter then.
Could you please advise if you take any measurement from the centre front and centre back when you go down a size. Many thanks. Is a very helpful article.
Thank you for reaching out. It depends on how the pattern is nested. If the pattern sizes are aligned on the center front or the center back, then you don’t add or remove from the cf/cb.
My bust measurement is 108 and my waist is 104 how do I grade
You find the size that corresponds to your bust and the size that corresponds to your waist. Draw a very gentle curve from one size in the bust to another size in the waist. Make sure the transition of the line is very smooth.
I have a reproduction pattern that is only in a size 18 and I need to grade it down to a 14, but it doesn’t have the extra lines to grade off of! Any advice? (These are vintage sizes so modern day this would be sizing from a small/medium to a xsmall.)
Anything advice would be greatly appreciated 🙂
Hi Hannah, then I’d use the “cut-and-spread” method. Take a look at this; I think you will get a better idea. https://www.threadsmagazine.com/2008/11/01/making-sense-of-pattern-grading
Fantastic! I found an old sewing pattern that belonged to my mum, but she only had the 12-16 sizes set and I needed a 10. This was really easy to follow 🙂
Thank you so much for this tutorial. It helped me to grade one Burda Style pattern for my girlfriend. I graded 3 sizes up. Made a muslin as well, before cutting the real fabric. There were few fit issues, but as it’s a summer dress and should be more loose, we decided to accept them 🙂 I’m not that experienced to fix them 🙂
Dress is not finished yet, but without this tutorial, we wouldn’t be sewing this dress at all.
Thank you again! 🙂 You made our day!
Awesomely useful – thank you!
After grading a commercial pattern up or down should I add a⅝ seam allowance? I am new to this alteration and grading stuff. Help! Thanks, Claudia
Hi Claudia, you don’t add seam allowances. The pattern pieces you start with already have them (unless you are grading a pattern that does not have seam allowances, like from Burda).
After grading commercial pattern up or down, should I add a⅝ seam allowance to new pattern? I am new to this alteration and grading stuff. Help! thanks, Claudia
Thank you for a very interesting article! I’ve ordered an out of print Vogue pattern that’s in size 14 + range but usually I cut an 8 in Vogue patterns. According to your explanation above, you’d only recommend this method to grade up to 2 sizes smaller. Do you think it’s possible to grade from a size 14 to an 8 and not lose the design of the top? Thanks. Christine
It depends on the year of the vintage pattern. Do you wear an 8 ready made or an 8 pattern. Pattern sizes do not correspond to ready wear adzes. I wear a size 14 pattern and a size 8 or 10 ready made .
Hi there
I am trying to expand some patterns for my granddaughter. She will be 8 in January and she is a size 9 in height and a 12 in the bust and waist so she is what i call chunky. is it possible to print these instruction out so I can understand and make notes on them.
Thanks for your help.
Suzanne Cross
Hi Suzanne, yes you can print the post out for your reference. Hope it’s helpful!
Do I need to download anything because when I tried to print it nothing came out.
I am not sure Suzanne. I think it’s the way the browser talks to the printer. All I can suggest is to try another browser and see. If not, you might have to save the link and come back to it when you need a reference.
Very clear on the whole. But I was confused why the red lines coming down from the new black dots along the curve are angled the way they are in Step 5? Whey do you need the red lines, don’t you just need the dots to then draw the new curve in Step 6? Thanks.
Hi Hibi, those red lines on the armhole curves are to help you to draw the new armhole curves. With a straight red line, you know the distance between size 18 and size 20 at that specific point in the armhole. You use that distance to determine where the black dot is for your new size. Imagine if you don’t have that line, you could make that new black dot, for example, 20 mm away from the previous size, instead of, for example, 6 mm, which makes the armhole really “wonky”. I decide the angles of those straight lines by approximately making each tangent to the curve. But you may notice that they are not exact, which is OK because we are only increase (or decreasing) a size or two.
Hi, is it possible that you mean you make the red lines ‘perpendicular to the tangent to the curve”. I believe the tangent would be closer to parallel to the curve, especially for the larger sizes.
Thank you for the explanation of grading. Can you comment on how many sizes this would be accurate for? For example, would grading from the largest size, 20 , to 30, or five sizes, be true to size, or would there be distortions with that big a change?
Thank you again.
I would only use this method to grade 2 sizes up or down. Too large or small would destroy the pattern, like you said. 🙂
Very clearly explained exellent useful tute
Excellent, added a few more fine tuning to my grading knowledge.
Also, I’d like to mention that I appreciate on your Itch to Stitch patterns that the grading seems to be in smaller increments (than other commercial patterns). So it is easier to get a great fit!