Liana Jeans Sew Along: Day 2 – Topstitching & Distressing
Welcome back to the Liana Jeans Sewalong day 2! We are not doing any printing, cutting or sewing today yet; we are still going over the ground work to build a solid foundation. Topstitching and distressing can make your Liana Stretch Jeans look store-bought, if that’s what you are after. Let’s go over both topics, and you can pull out couple pairs of your jeans and check them out at the same time.
Topstitching
Most of the topstitching on Liana Stretch Jeans (or any other jeans for that matter) are decorative rather than functional. That means you can use your creative license for topstitching. The back pockets are not the only places where you can be creative. Want to put three lines instead of two? Want to use your sewing machine’s decorative stitches? Want to use different colors next to each other? Go right ahead! You are the master of your fate, the captain of your soul, and the designer of your jeans. Testing is really the key; stitch on a piece of scrap to make sure you are happy with your designs before moving onto the real jeans.
Topstitching Tread
Yesterday we mentioned the topstitching thread that you could use, which are:
- Two strands of regular 100% polyester thread
- Jeans topstitching thread
- Any other thicker thread, such as buttonhole or upholstery thread
But you really don’t know until you test them out on the washed denim that you are planning to use. Keep in mind that most of your topstitching will be on three layers of fabric (two seam allowances behind one layer of outer fabric), so that what I used to do my test. Let me share with you my evaluation process.
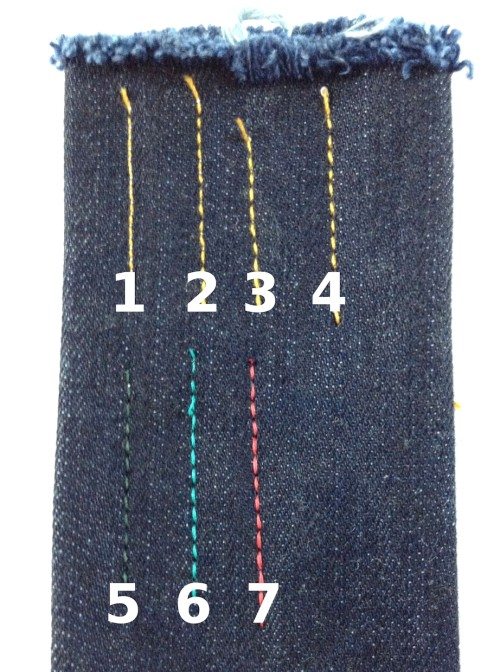
Making decision on topstitching
- This thread is labeled “Jeans Topstitching” by Coat & Clark Dual Duty Plus. It’s fairly thick. I used a stitch length of 2.5 mm, which is the default of my sewing machine. You see it’s a solid mass; you can’t even see the distinct stitches very well.
- Then I used the same thread, but a longer stitch length of 3 mm. It’s still quite wonky.
- Let me increase a bit more to 3.5 mm. Now it’s much better, but the stitches are fairly loose, which means the tension is off.
- I decreased the tension from the default of 4.0 to 2.2 (I cheated here a little since I already knew that this tension works from my experience). I found that decreasing the top tension works because the bobbin thread has relatively stronger tension now and it pulls the thread toward the bottom, which makes the stitches more clear from the top.
- I used another color and type of thread. This dark green one is labeled “Heavy” by Coat & Clark Dual Duty XP. I used the same stitch length (3.5 mm) and tension (2.2) since the setting worked. The stitches look good, but you can barely see them.
- I switched to two strands of 100% polyester thread by Coat & Clark Dual Duty XP. Hmm… it skipped a stitch; maybe it’s an anomaly. I do like the color.
- This last one is two strands of 100% cotton thread by Gütermann. I like it too.
I decide that I am using the more classic color of number 4. The stitch length of 3.5 mm and tension of 2.2 work for my sewing machine, my fabric and my thread (and yours will certainly be different). Also I am using a size 18 jeans needle. If your fabric is thinner, you could experiment with a smaller needle. Be sure to record the settings, or you might forget and end up using different settings for different parts of your jeans. Your machine may be using a dial to adjust stitch length and tension, so you can still record the number setting accordingly.
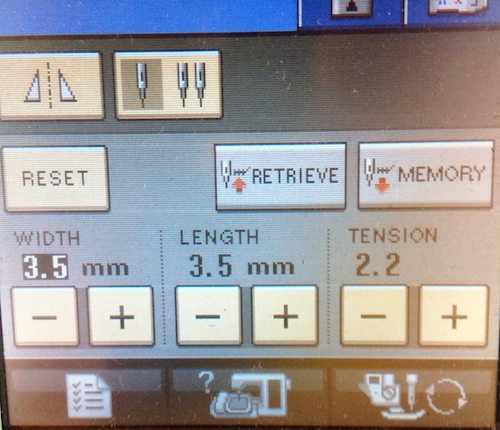
This setting works for me
Here are other tips for topstitching:
- Whatever your topstitching selection is, use it only on the top thread, not the bobbin thread. You should use your regular 100% polyester thread in the bobbin.
- You may have to hammer (or use your mallet) to reduce the seam bulk, especially for four-way intersections at the bottom of the crotch and at the back yoke. Even so, at times I need to “walk the stitches” by using the hand wheel to go over those intersection slowly and manually.
- Some people swear by the triple stretch stitch offered by some computerized sewing machines. I don’t particularly like it because it’s hard to make a perfect curve when the stitches go back and forth several times. But you may like it, so don’t let me stop you from experimenting with it.
- Some people don’t like the fact that you have to switch between different thread for construction and topstitching. The reality is that there’s no way to do all the construction first and then topstitch. You may be able to proceed with several construction steps, but very soon you have to switch thread as you are crossing seams. If you have two sewing machines, hooray to you and you can use one for construction and one for topstitching. But who has that luxury? You just have to get really good at switching thread and switching setting. But I’ll let you in on a secret: when I use double strands of thread as topstitching, I continue to use them for constructions without changing them out. Yes, I’d be using more thread, but I decided that that’s worth it for less work, and the extra thickness is not unnoticeable. However, I don’t do that if I use the jeans topstitching or heavy thread. And I do change the tension and stitch length accordingly.
- I use jeans needle only; I do not use topstitching needle for sewing jeans. I found that it makes no noticeable difference and I’d rather not have the extra work of switching. That does not mean topstitching needles are the same as jeans needles. Basically a topstitching needle has a bigger eye to accommodate the thicker topstitching thread, whereas the a jeans needle is designed to have an acute point and go through fabric better on dense woven fabrics. If you want to experiment the difference, you should go ahead and do it. I evaluated the return on my time investment, and I decided to make this short cut.
- It’s less pretty to use back stitch to secure the beginning or the end of the topstitching when the beginning/end is not hidden inside a seam. In that case, you should pull the thread to the back and tie a double knot.
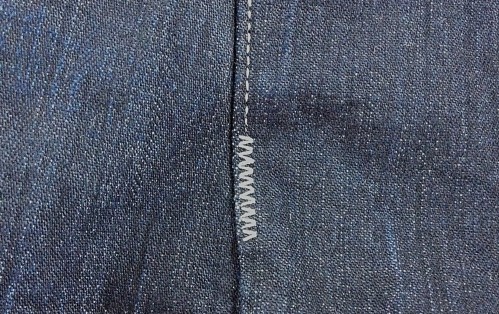
Because the beginning/end of the topstitching is not hidden in the seam, don’t back stitch if you want it prettier.
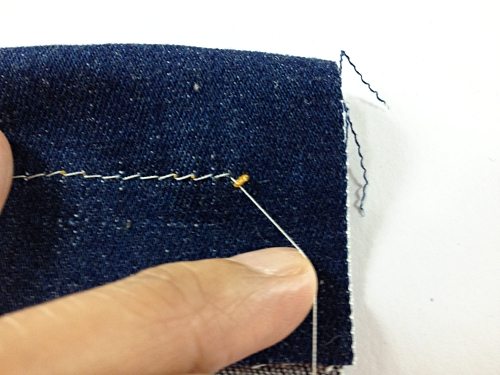
But rather, pull bobbin thread to bring the topstitching thread to the back, then tie a double knot.
I have more tips for you but they are probably better suited as I go through the process, so stay tuned.
Distressing
Distressing can add a lot of personality to your Liana Stretch Jeans. If you are using denim fabric, you can consider distressing your jeans. But a lot of bright color jeans or corduroy jeans are not distressed, so it’s completely up to you.
Distressing is to imitate the worn look, so think about and observe your old jeans where they are worn out. Here’s an example using my pretty worn-out jeans.
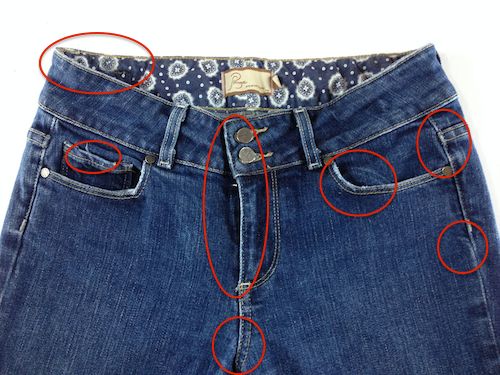
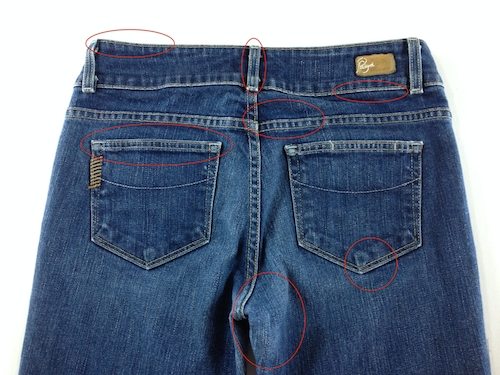
These are not too crazy in distressing; there is no hole or anything big, but you can see that pretty much every seam and every fold are worn to some degree. You may also want to add some distressing at the knees, the upper thighs and the hems.
Our tool of choice for distressing is 220-grit sandpaper and hand sanding block. Keep these in mind when you sand your jeans.
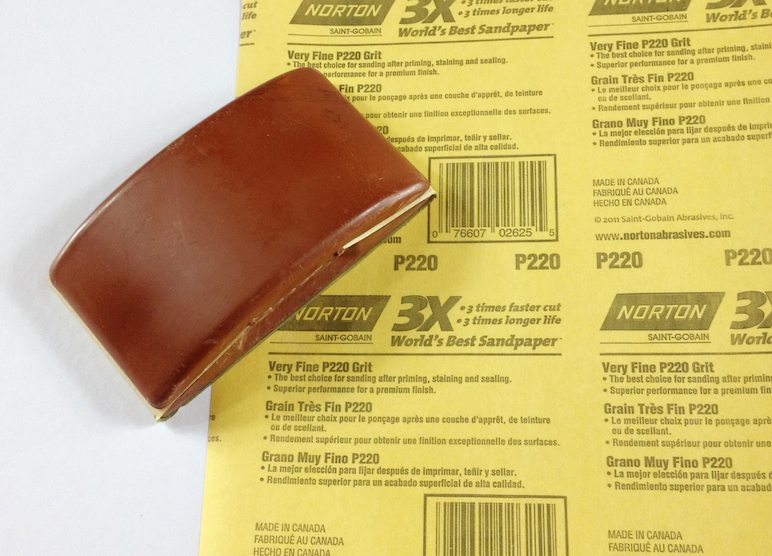
Sanding block and sandpaper
- You have to distress before you topstitch, or you will be rubbing your topstitching off. The sequence of event is: 1) sew the seam, 2) press the seam, 3) sand the seam on the right side (no need to sand the wrong side!), 4) finish the seam allowance, and 5) topstitch. Yes, it’s a lot of work for each seam, but if that’s something you want, you have to work for it!
- Sand lightly first, or you may rub an unwanted hole on your fabric. After you get a hang of how much force you need, then you can safely sand the rest with that same force.
- If you have very thin fabric, go even easier (or don’t distress at all). Stretch denim tends to be thinner than 100% cotton denim.
- To add the whisker effect on the upper thighs, you will have to wear the jeans at the end to create some horizontal wrinkles and sand those wrinkles. Be careful not to sand on any existing topstitching.
- Any object you put underneath the fabric while sanding will make an impression on the right side. Check out the back pockets in the photo above; you see the impressions of the seam allowances? If that’s what you want, great! If not, be sure to remove any object or put something flat underneath to isolate the area before sanding.
- Experiment with sanding vertically and horizontally to find the look you’d like.
- If you want more intense distressing, such as cutting some holes, you can do that by using a razor blade or scissors. Then you sand the cut to make a more natural look. You’d do that at the very end.
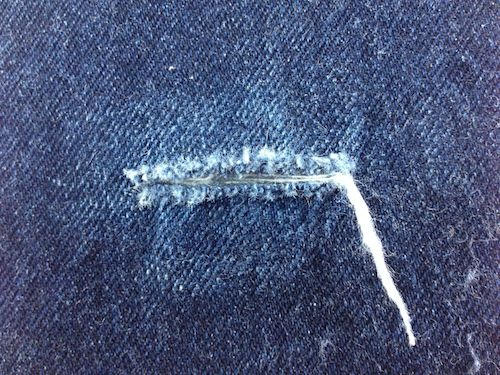
Cut a hole and sand it
You can also hammer the seams to add some more distressing. You can even dab some bleach to create blotches. Go crazy! You don’t need my permission!
Here’s the schedule of the Liana Stretch Jeans Sew Along, be sure to look at other posts too!
Day 0: Get Ready!
Day 1: Intro, Material and Supplies
Day 2: Topstitching & Distressing (this post)
Day 3: Choosing a size & Cutting Test Garment/Muslin
Day 4: Fitting Part 1
Day 5: Fitting Part 2
Day 6: Sewing the Back
Day 7: Sewing Front Pockets
Day 8: Sewing Fly Front Zipper
Day 9: Sewing Back to Front & Waistband
Day 10: Hemming and Finishing


Thanks Kennis for the great topstitching tips. I think I am going to skip the distressing this time around!
I think that’s a smart move Judy. After getting the perfect fit, the process is going to be faster and you will feel like taking the time to do the distressing.